
By hosting node-red in the cloud, FRED can act as an intermediary between devices and cloud services. To illustrate this, let’s create a system that send a notification when a user wearing a Fitbit Flex comes in range of a Bluetooth scanner. We’ll distribute the job of discovering and filtering bluetooth devices between a device and a FRED-hosted node-red instance. This will allow us to change how notifications are delivered, or make use of the scanner for other purposes without changing the device flow.
For this example, we’ll need a Fitbit flex, and a computer with Bluetooth 4.0. We’ll make use of a BLE scanner node to detect Bluetooth devices and run the flow on a Mac laptop. It should be possible to run this flow on any Mac or Linux machine supported by the node and the noble Bluetooth scanning library it uses. We’ll use FRED to host the cloud-hosted flow.
First install node and node-red on your Macintosh. See http://nodered.org/docs/getting-started/installation.html
Once it is installed, install the BLE scanner node in your node-red directory:
cd ~/.node-red
npm install npm install node-red-contrib-noble
Now, start node-red on your Mac.
cd ~
node-red
Let’s get started creating our BLE scanner flow. First we’ll make sure the scanner is working. Drage a scan ble node to the canvas, and connect it to a debug node to see the output. Be sure to configure the debug node output to show ‘complete msg object’ to ensure we see all of the properties in a message generated by the scanner.
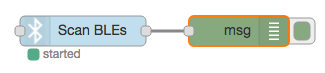
Figure 1. Simple BLE scanner flow.
Once this is done, bring a Fitbit flex in range to the computer and deploy the flow. If all is well you should should see output similar to Listing 1 in the debug pane when it discovers devices. If not, try modifying the flow by changing the name of one of the nodes and deploying it again. This will trigger another scan.
{ "payload": { "peripheralUuid": "88e1ab7bcfa4493dbaf16c55e69a4881", "localName": "Flex" }, "peripheralUuid": "88e1ab7bcfa4493dbaf16c55e69a4881", "localName": "Flex", "detectedAt": 1452023547186, "detectedBy": "myhost.local", "advertisement": { "localName": "Flex", "txPowerLevel": -6, "serviceData": [ { "uuid": "180a", "data": [ 7, 4 ] } ], "serviceUuids": [ "adab1fb86e7d4601bda2bffaa68956ba" ] }, "rssi": -89, "_msgid": "a017136d.5fe8f" }
Listing 1. Example from scan ble node on discovery of a fitbit Flex.
Now we’ll add some additional features to the flow to trigger scanning and simplify the output of our scanner for processing. First, let’s add the nodes we need to start and stop scanning. Add an inject, trigger and function node and wire them up to the scanner as shown in Figure 2.
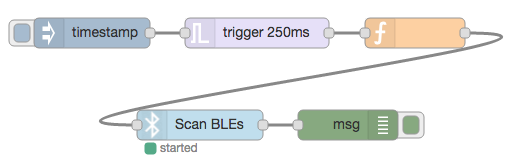
Figure 2. Nodes needed to control scanning.
Configure the inject node to send an ‘on’ message every 10 seconds as shown in Figure 3.

Figure 3. Inject node configuration to send ‘on’ string every 10 seconds.
Then configure the trigger node to send an ‘on’ then an ‘off’ message 7 seconds later as shown in Figure 4.
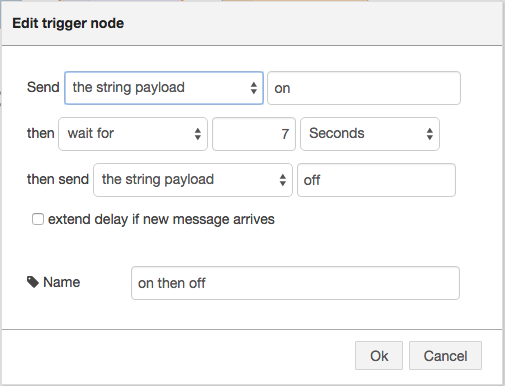
Figure 4. Trigger node configured to send ‘on’ then ‘off’.
Finally, we’ll configure the function node to send the scan trigger message needed by the ble scanner to control scanning. Add the code shown in Listing 2 to the function.
1. if (msg.payload === 'on') {
2.     msg.scan = true;
3. } else {
4.     msg.scan = false;
5. }
6. return msg;
Listing 2. Convert on and off to scan messages.
After deploying the flow will trigger a new scan every 10 seconds, turning off the scanner after 7 seconds.
Now we’ll add a node to clean up the output, only sending the local name of the device discovered. Add a function node to the end of the scanner, along with a debug node to check the output. Add the code shown in Listing 3 to the function node to simplify the output.
1. var newMsg = {};
2. if (msg.localName) {
3.     newMsg.payload = msg.localName;
4.     return newMsg;
5. }
6. return null;
Listing 3. Function to send only the localName property
The new flow will look something like Figure 5.
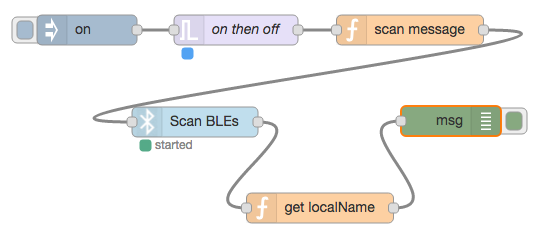
Figure 5. Bluetooth scanner flow.
Cool – we’ve built a nice bluetooth scanner. Now lets connect it to the cloud.
On FRED create a flow that receives data from a public websocket, checks whether the payload is a ‘Flex’ and if so, sends a notification to pushbullet. The flow is shown in Figure 6.

Figure 6. Flow to send notifications to pushbullet when Flex is detected.
Configure the web socket node as shown in Figure 7 to listen on /public/presence. The ‘/public’ prefix is used on FRED to indicate that the URL should be open to the public; no authentication is required. FRED this will map to wss://{userid}.fred.sensetecnic.com/api/public/presence where userid is your FRED username.
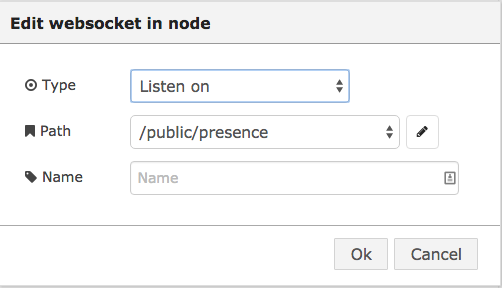
Figure 7. Web socket node configured to listen on /public/presence
The simple code for the filter function is shown in Listing 4.
1. if (msg.payload === 'Flex') {
2.     return msg;
3. }
4. return null;
Listing 4. Filter out messages that don’t contain ‘Flex’.
Now let’s connect our device to our cloud hosted notification service on FRED. We’ll add a web socket client connection to the flow as shown in Figure 8.
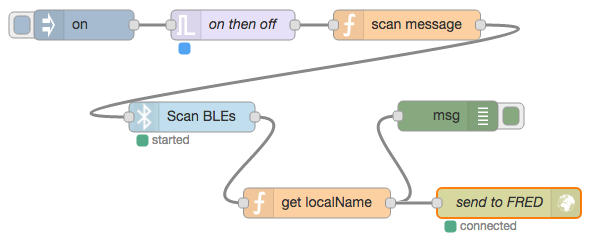
Figure 8. Flow with websocket client connection from scanner to FRED service
The websocket client should be configured as shown in Figure 9 to connect to your FRED instance with the URL wss://{username}.fred.sensetecnic.com/api/public/presence
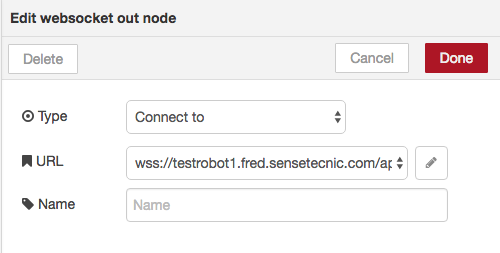
Figure 9. Client side websocket configuration to connect to FRED.
Whew! Now that we’ve got everything hooked up, you should get a pushbullet notification whenever a Flex is in range. Note that because we scan every 10 seconds, you may get a notification as often. You can add additional nodes (hint: check out the delay node) to filter out repeated discovery messages, and or connect this presence information to other services and cloud connected devices.