
LoRa wireless modulation is growing in popularity for IoT development. Its long range and low power consumption make it suitable for many IoT applications. This blog post will discuss the experience setting up a LoRa P2P network using the Adafruit Feather M0 Lora module board and Dragino Lora/GPS HAT on a Raspberry Pi. We also take advantage of using Node-RED on Raspberry Pi to send data from the local P2P network to a cloud-based server. In this test, we were able to set up two devices communicating near 1km apart in the city.
Note: This post is mainly about the P2P connection using LoRa modulation. It is not intended to follow the LoRaWAN standard. We will talk about setting up LoRaWAN network connections in a separate post.
About LoRa
LoRa(Long Range) is the physical layer telecommunication technology that modulates based on using Chirp Spreading Spectrum(CSS), which shifts an RF tone in a very linear way (up or down within a certain time period). The characteristics of CSS are: high robustness(resistant against noise), multipath resistant, low power consumption, low latency(needs no synchronization), very long range(claims to provide communication signal at a range of a few KMs in cities) at the expense of low data rate and small payload; for example, 0.018~38.4kbps for the LoRa Raspberry Pi HAT that we are using, maximum packet length is 256 bytes).
Here is a definition from Semtech’s LoRa FAQ:
“LoRa (Long Range) is a modulation technique that provides significantly longer range than competing technologies. The modulation is based on spread-spectrum techniques and a variation of chirp spread spectrum (CSS) with integrated forward error correction (FEC). LoRa significantly improves the receiver sensitivity and as with other spread‐spectrum modulation techniques, uses the entire channel bandwidth to broadcast a signal, making it robust to channel noise and insensitive to frequency offsets caused from the use of low cost crystals. LoRa can demodulate signals 19.5dB below the noise floor while most frequency shift keying systems (FSK) need a signal power of 8-10dB above the noise floor to demodulate properly. The LoRa modulation is the physical layer (PHY), which can be utilized with different protocols and in different network architecture – Mesh, Star, point to point, etcetera.”
Hardware:
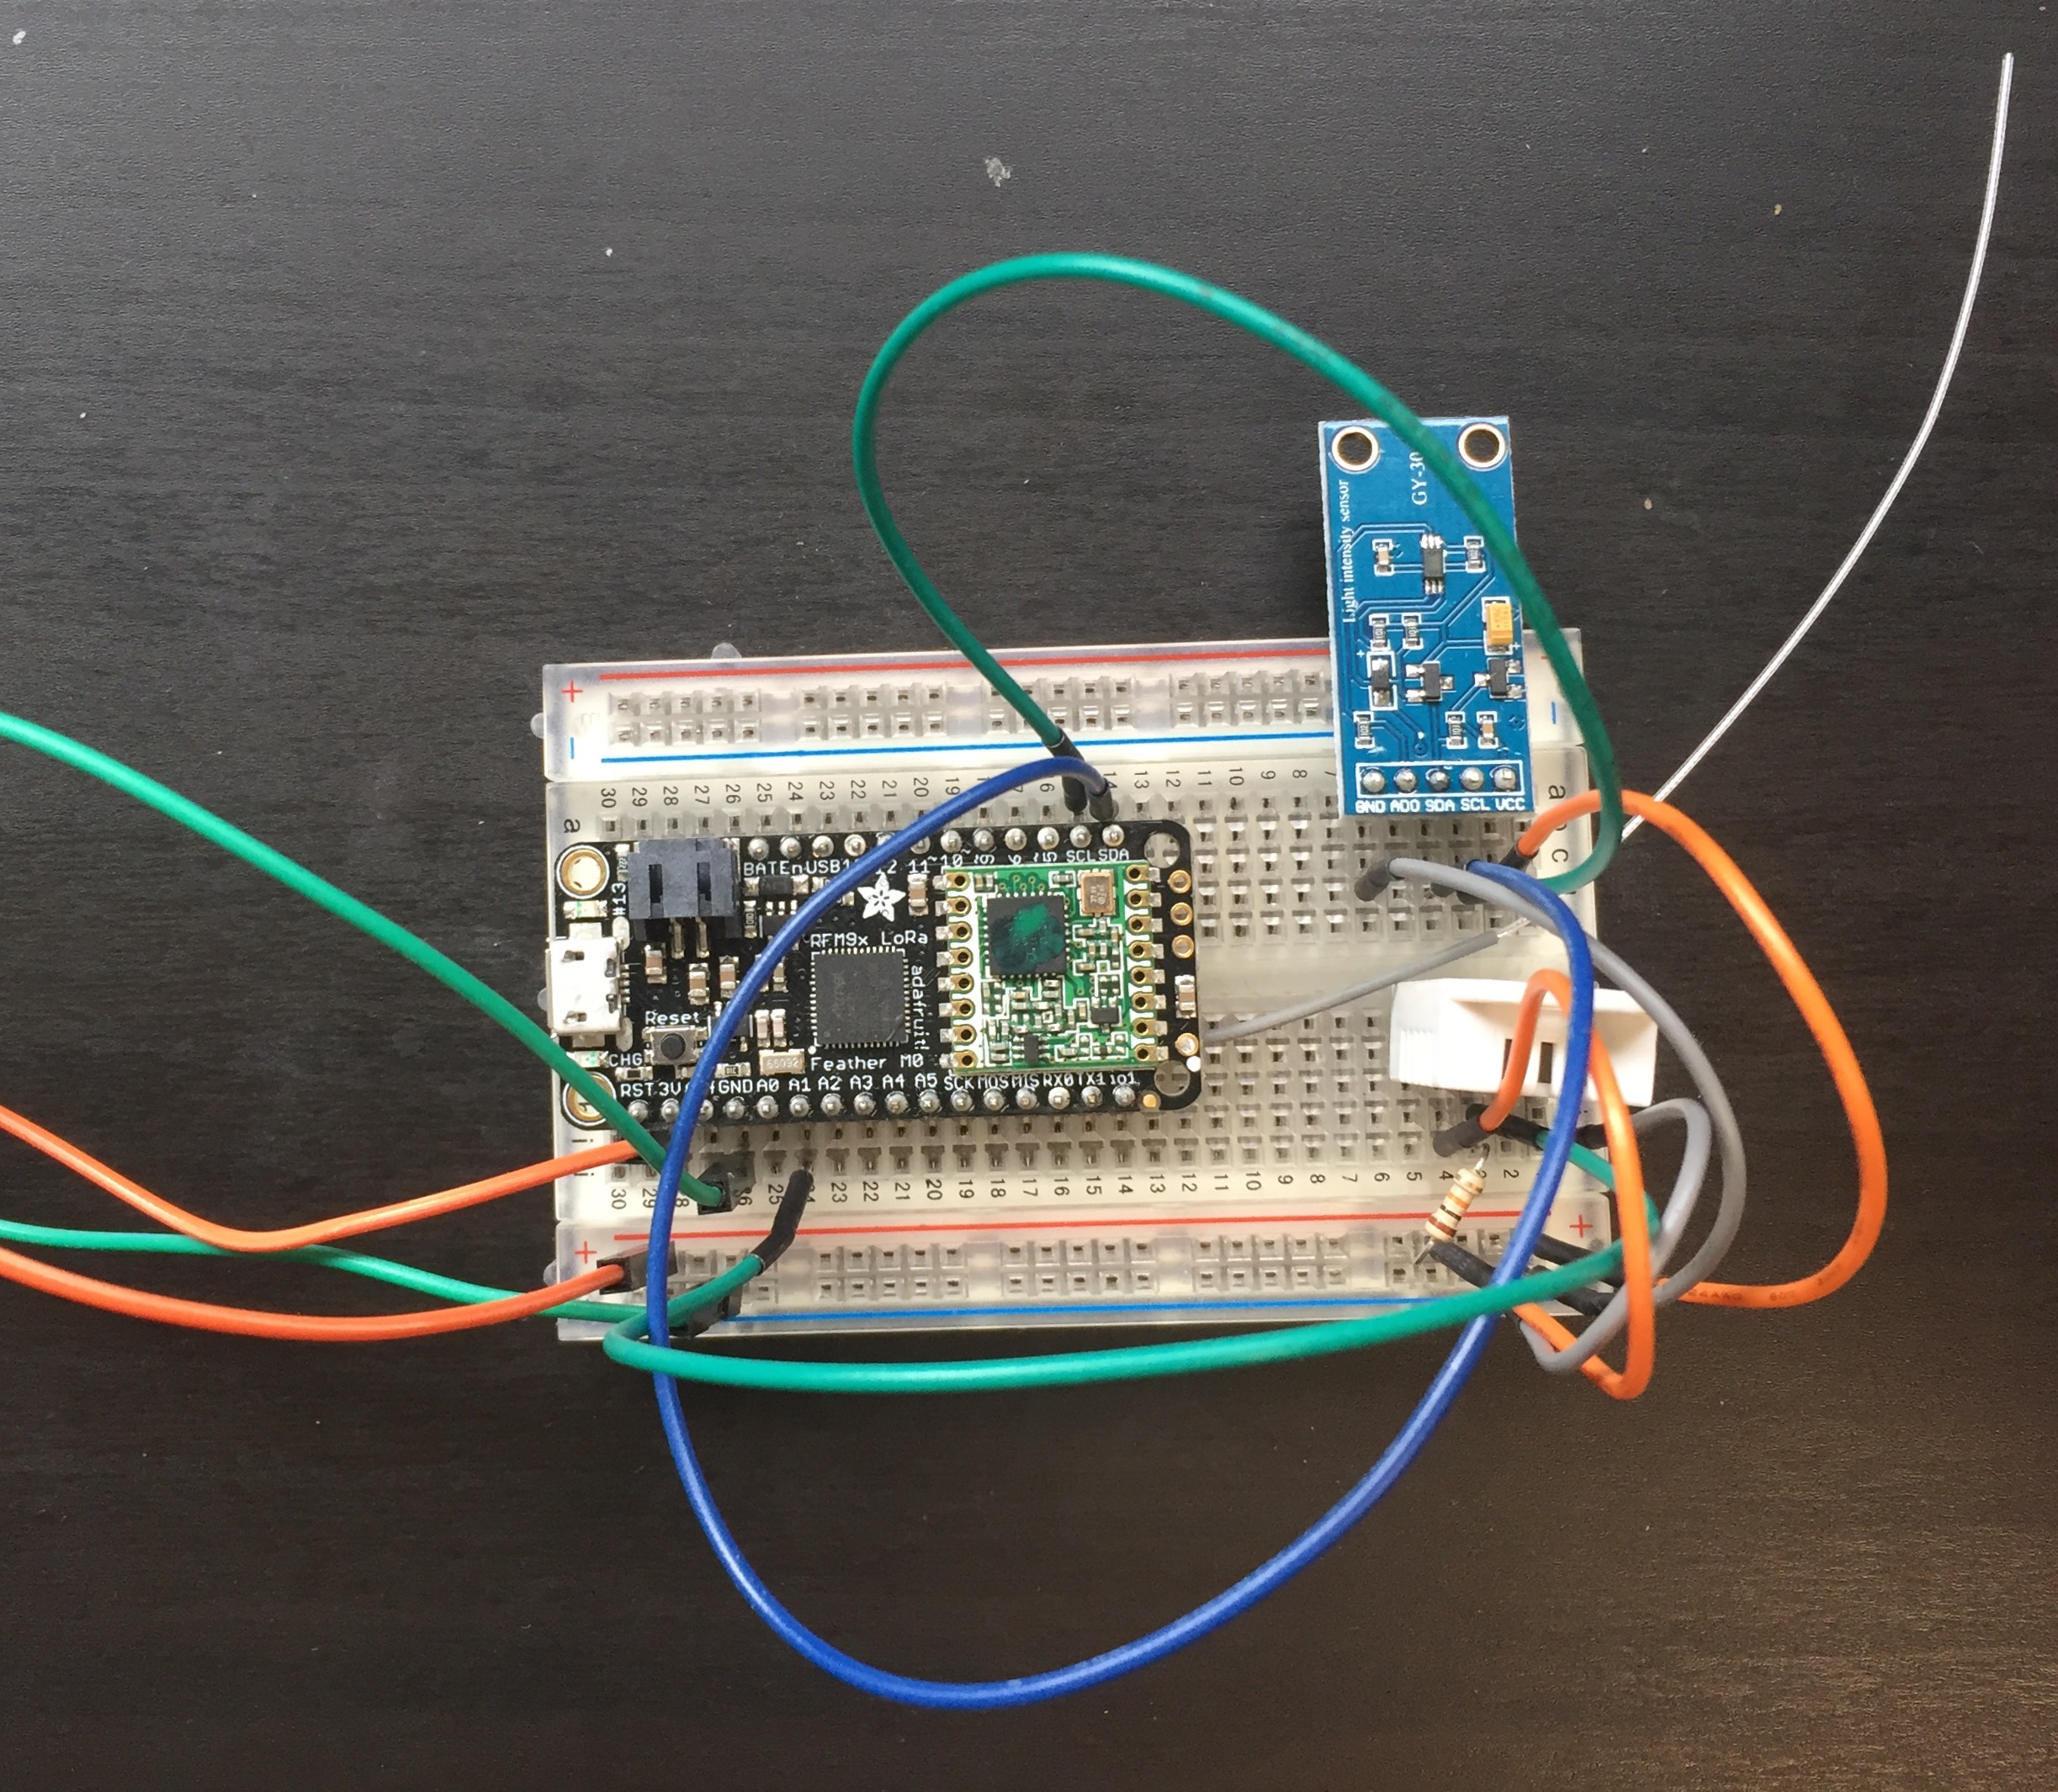
For the end-nodes, we used the Adafruit Feather M0 Lora board. We also used DHT 22 (temperature and humidity sensor) and BH1750 (light intensity) sensors to provide data.
For the gateway, we used the Dragino lora Lora/GPS HAT on a Raspberry Pi 2.
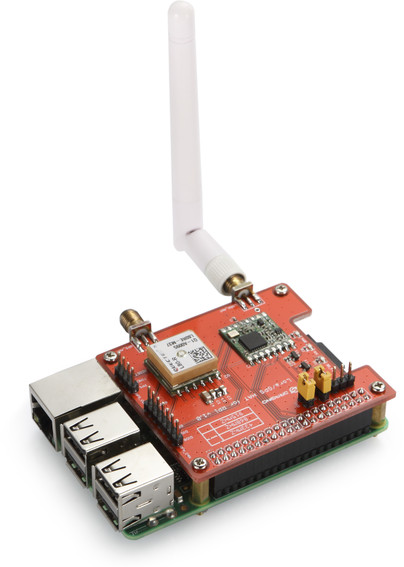
(photo from CNX-software)
Software:
For this P2P connection, we used the RH_RF95 library to drive the transceivers on each end-node and the Dragino LoRa HAT. We chose this library because it provides a quick setup for testing LoRa modulation. However, keep in mind that this test run does not follow the LoRaWAN standard.
We also used Node-RED on Raspberry-Pi to process the data received from the end-nodes and send to the STS-MQTT platform.
Diagram Flow:

Setup:
End-node
The development on the end-node is very straightforward. Adafruit has provided a detailed instruction and sample code on their site. We used the same code from the Adafruit samples to setup and run the LoRa transceivers, but we added other code to read data from the sensors. In this experiment, we defined the addresses of the end-nodes as “1” and “2”, we also read the values from each sensor at the beginning of the loop.
However, when developing with this particular board, we hit some roadblocks and could not find answers from the datasheet provided. Keep in mind that, at the Feather M0’s heart is an ATSAMD21G18 ARM Cortex M0 processor, clocked at 48 MHz and at 3.3V logic, the same one used in the new Arduino Zero. You will be able to find useful information (such as the pin-out) from the Feather M0 basic prototype datasheet.
You will also notice that because of the lightweight processor, the library for M0 processor is different from the regular Arduino processors. So it created some compile issues when I tried to add the float data values to a char array. The Feather M0 basic prototype datasheet also mentioned about the solution for that.
After the code was completed, the end-node will broadcast a buffer message. A sample broadcasted message would be like:
1,18.0,35.1,512.5
which means the user-defined node ID(1), the temperature in C(18.0 C), the humidity reading in percentage(35.1%) and the light intensity in lux(512.5 lux). Note that the message will be broadcast as a buffer message.
Gateway
In this particular test run, we followed this guide to set up the Dragino HAT on a Raspberry Pi. This guide provided clean sample code examples for setting up Pi to send/receive messages using the same RH_RF95 library as the end-nodes.
To add more functionality to this gateway setup, we borrowed some sample code from the original Dragino HAT wiki where it shows how to set up a single channel packet forwarder. In the sample code, you will see how the gateway sends data to the Things Network via UDP. We added in the function where it sends UDP packets and modified the UDP endpoint to localhost. By doing this, we will be able to receive the data on Node-RED using a UDP node and perform some data processing, or even sending to FRED, our cloud hosted Node-RED service.
A good tool to troubleshoot at this point is to use the tcpdump on Raspberry Pi that constantly monitoring the packets you receive and send on a specific port.
Node-RED on Gateway
We used Node-RED on the gateway to capture the UDP packets with this flow:
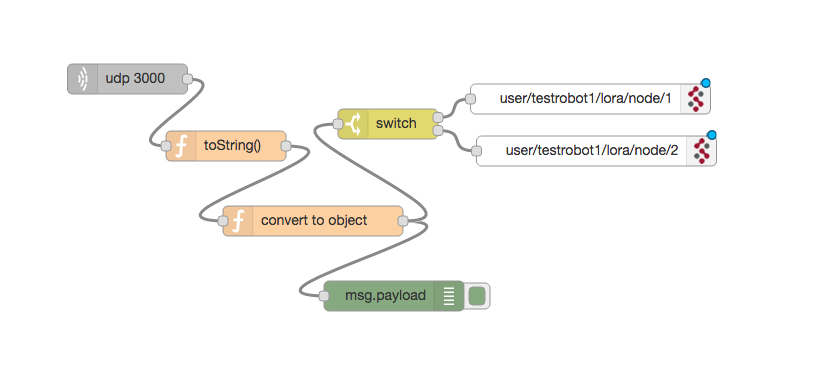
As you can see, we used the UDP node to listen on port 3000, the port that we defined in the gateway program. By default, the gateway program receives a buffer message from the end-nodes, and redirect the buffer packets via UDP. To make the data meaningful, we need to convert the buffer object to human-readable by using the toString method. We also set a function node to convert the string to a more meaningful JSON object. Here is what we did:
var list = msg.payload.split(",");
msg.payload={
  "node_ID":list[0],
  "temp":list[1],
  "humidity":list[2],
  "light":list[3]
}
return msg;
It’s a very simple function node that changes the data string to a JSON object where we can parse it easily. The following Switch node sends the data packets to different MQTT topics according to the different node_ID in the message objects. We used the STS-MQTT platform to send data from Raspberry Pi to FRED.
Outcome:
With the FRED system, once we receive the incoming data from the STS-MQTT platform, we are able to visualize the sensor data easily with the dashboard node:
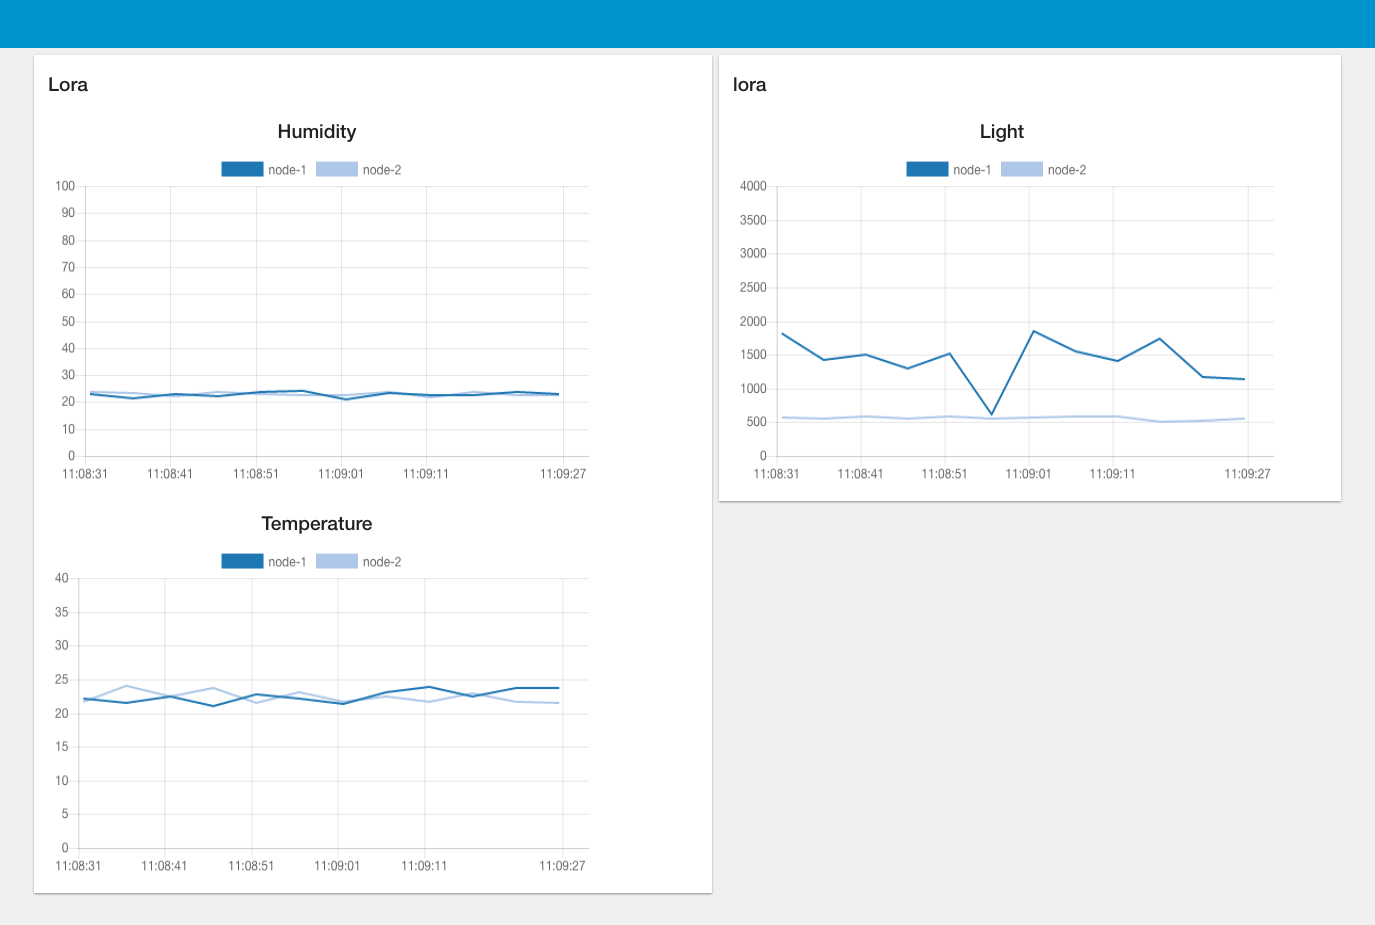
Overall, by using the LoRa modulation devices, we are able to connect nodes over an impressive long distance and provide meaningful data. We also used FRED and the STS-MQTT platform as data processing tools to further help us to interpret the data. Now we are excited to do more experiment with the LoRa technology.
About Sense Tecnic
Sense Tecnic Systems Inc have been building IoT applications and services since 2010. We provide FRED, cloud hosted Node-RED as a service to the community. We also offer a commercial version to our customers, as well as professional services. Learn more.