
In this tutorial we take our Pi-Zero security camera scenario one step further and add image recognition supplied by the very cool AWS Rekognition service using the FRED Node-RED cloud service.
The UI for the application is shown below. We have a button that requests a new photo from the remote camera. Once the photo is received, the image is processed and the recognition service labels are shown underneath.

To build this application, we’ll use two new flows hosted in the cloud. The first flow will trigger and receive security camera images from a remote location as described in a previous tutorial (tutorial link). We’ll modify this flow slightly so that when we receive an image from a remote location, we’ll also store the image in S3 to trigger image processing in AWS.
To do the image processing, we’ll set up a lambda function for processing images in an S3 bucket. This function will call AWS Rekognition for performing image recognition and labeling of the image. To return the labels back to Node-RED running in the FRED service, we’ll use AWS SQS. To do this, we will make use of these AWS services using the node-red-aws-contrib node.
Image Receiving Flow
The first remote security dashboard flow is shown below.
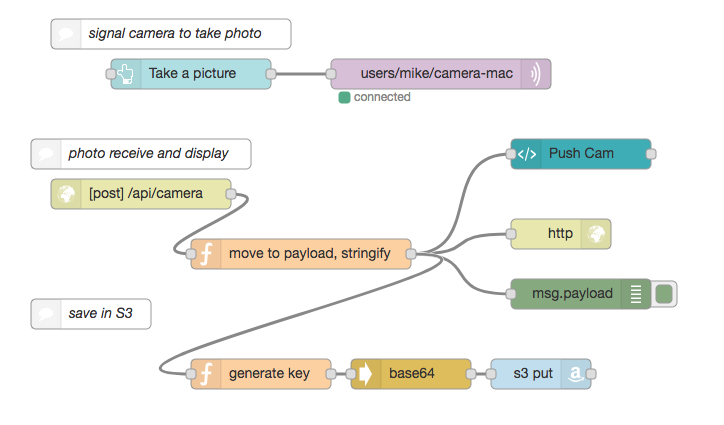
In this flow we use a dashboard ui button node called ‘Take a picture’ to trigger a message which is sent to a remote flow running on a Raspberry Pi via MQTT to take a photo as described in a previous tutorial. The Pi’s camera flow POSTs the image it takes to the /api/camera http endpoint shown.
We then move the image data in the http body to the message payload and stringify it for the template node to display it using the function node.
msg.payload = msg.req.body.toString();
return msg;
The message is then sent to a template ui node to display the image in the dashboard. The template node looks as follows:
Push Cam
<img src="data:image/png;base64,{{msg.payload}}"
id='img'
alt='Getting Image'>
The same message is sent to a function node where we generate the S3 key (filename) for the file to be stored in an S3 bucket:
msg.key = 'snapshot-'+new Date().getTime()+'.png'
return msg;
The image payload is current base64 encoded. Before saving the image in S3, we decode it using the base64 node. We then use the S3 node from node-red-contrib-aws to save the image in a bucket.
Using AWS Lambda to call Rekognition
Once the image is in S3, we let the AWS systems do their thing. To do so, we need to set up an AWS lambda function to call the Rekognition service and return our results. We’ll need to set up an SQS queue to receive results from the image recognition service.
The python code for our lambda function we used is here:
from __future__ import print_function

import boto3
from decimal import Decimal
import json
import urllib

print('Loading function')

rekognition = boto3.client('rekognition')
sqs = boto3.resource('sqs')
queue = sqs.Queue('https://your/sqs/url')

# --------------- Helper Functions to call Rekognition APIs ------------------

def detect_labels(bucket, key):
response = rekognition.detect_labels(Image={"S3Object": {"Bucket": bucket, "Name": key}})
return response

# --------------- Main handler ------------------

def lambda_handler(event, context):
    '''Demonstrates S3 trigger that uses
    Rekognition APIs to detect faces, labels and index faces in S3 Object.
    '''
    # Get the object from the event
    bucket = event['Records'][0]['s3']['bucket']['name']
    key = urllib.unquote_plus(event['Records'][0]['s3']['object']['key'].encode('utf8'))
    try:

        # Calls rekognition DetectLabels API to detect labels in S3 object
        response = detect_labels(bucket, key)

        # Print response to console.
        print(response)

        # Send result to SQS
        queue.send_message(MessageBody=json.dumps(response))

        return response
    except Exception as e:
        print(e)
        print("Error processing object {} from bucket {}. ".format(key, bucket) +
            "Make sure your object and bucket exist and your bucket is in the same region as this function.")
        raise e
Displaying Image Labels on Dashboard
Once image recognition is done, we want to display the results in our application window. To do this, we have another flow as shown below:

In this flow, we use an inject node to poll for any new messages waiting in AWS SQS. The SQS receive node then sends the message to the function node to move the label data to the payload:
if (msg.payload.Messages && msg.payload.Messages.length > 0) {
    msg.payload = msg.payload.Messages[0].Body;
    return msg;
}
return null;
This JSON payload is then converted to a Javascript object and sent to the UI template node for display. The template to show the label list is simple:
Image Labels
 <ul>
 <li ng-repeat="label in msg.payload.Labels">{{label.Name}}: {{label.Confidence}}%</li>
 </ul>
We’ve added an SQS delete node to clean up messages from the queue once processed, and a catch node to view any errors that are thrown.
Summary
That does it. Now, when we click on the Take a Picture button in our dashboard, we send a signal off to our remote Pi Zero to take a photo. The photo is pushed into the cloud for display and image analysis on our Node-RED Dashboard.
To keep things brief, some of the details may have been glossed over in this tutorial, and of course there are many ways to extend it. If you have any questions about this tutorial, want to get a copy of the JSON flows, or find any errors, feel free to contact us by email.
Related links and resources
- Pi Zero Web Camera with Image Analysis and Amazon Web Services Part 1
- Pi Zero Web Camera with Image Analysis and Amazon Web Services Part 2
- Node RED AWS Contrib Node
- AWS Rekognition
- AWS S3
- AWS Lambda
- AWS SQS
About Sense Tecnic: Sense Tecnic Systems Inc have been building IoT applications and services since 2010. We provide FRED, cloud hosted Node-RED as a service to the community. We also offer a commercial version to our customers, as well as professional services. Learn more.