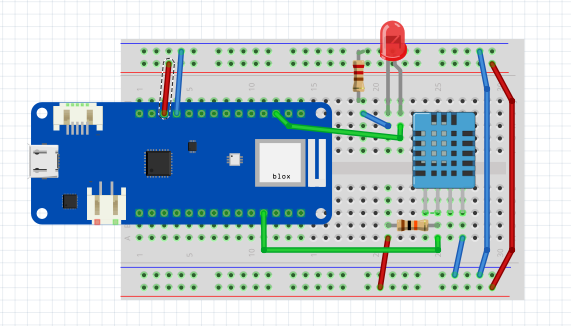
Augment an Arduino-based weather station with external service notifications using the FRED Cloud-hosted Node-RED service.
This tutorial has been moved to our main Node-RED site:
Augment an Arduino-based weather station with external service notifications using the FRED Cloud-hosted Node-RED service.
This tutorial has been moved to our main Node-RED site:
We’ve seen a few folks playing around with FRED to access – and in some cases – trade on cryptocurrencies, which we thought was a fun use of Node-RED. Our very own crypto expert, Ted, here at STS decided to jump in and develop a new Node for accessing and using the Binance cryptocurrency platform. Continue reading “FRED (Cloud Node-RED) and cryptocurrencies”
The new Pi Zero W is a great hardware platform for creating all kinds of interesting hardware gadgets. With built in bluetooth, wifi, and a camera connector, it seems like the ideal system for creating a security cam. Of course one of the best things about the Pi Zero is that it runs Node-RED! Continue reading “Monitor a Pi Zero-hosted security camera with Node-RED, FRED and STS-MQTT”
This tutorial will show you how to use FRED — a cloud-based Node-RED — to control and read data from Arduino boards using an ESP8266 module and the STS-MQTT platform. The ESP8266 is a popular, low cost Wifi module Continue reading “Tutorial: Connect Arduino boards to FRED (Cloud Node-RED) via ESP8266 and the STS-MQTT platform”
This tutorial will show you how to use FRED — a cloud-based Node-RED — with the IBM Watson cognitive services. We will be using the node-red-node-watson module developed by IBM, Continue reading “Tutorial: use the Watson cognitive service with FRED (Cloud Node-RED)”
MQTT is a popular protocol for data transmission for many developers, especially for Internet of Things applications. The new Sense Tecnic MQTT service (STS MQTT) provides FRED users an easy way to setup and to manage MQTT connections with devices and Node-RED on FRED. This blog post shows you how to use the public data feeds feature on our STS-MQTT platform for publishing and subscribing to public data streams. Continue reading “Using public data feeds on the STS-MQTT platform using Node-RED”
This tutorial shows you how to use FRED — a cloud-based Node-RED — to build an AI chatbot using the IBM Watson Conversation service as the Natural Language Understanding (NLU) agent.
Building a smart chatbot can be complex. In this tutorial, we will show you how to build an AI chat bot by writing a Node-RED flow on the cloud-service (FRED) that can handle multiple users and maintain the context of conversations on the cloud server. We will be using the node-red-contrib-chatbot node and the node-red-node-watson node. We will also show you how to set up the IBM Watson Conversation service and use it to interpret natural English language input from users. Finally, we will use the Walmart database API in the tutorial sample for product information.
Node-RED provides a great way to connect various messenger platforms to online AI services, and it is capable of performing various processing tasks upon receiving requests from users. This is what makes a Node-RED AI chatbot exciting.
We have provided sample code here. If you do not know how to import flows, you can refer to this article.
If you don’t already have an account on FRED (Cloud Node-RED), set one up now. It’s free for a demo account, which can be used for these tutorials and any other experiments you may have with Node-RED. Register for a free account at http://fred.sensetecnic.com.
After registering, make sure to activate your account via your email. You will not be able to log in until you validate your account.
IBM Watson is a growing software platform that provides easy access to artificial intelligent (AI) services for commercial and development usages. The Watson Conversation service is one of the Watson applications that uses machine learning to understand and interpret natural human language input and to output the appropriate response to simulate a natural conversation between humans. Developers can supply data and train the conversation application as defined for various purposes. Therefore, by using the IBM Watson Conversation service, a chatbot can both output correct analytic data to software applications and natural human language to users.
About Sense Tecnic: Sense Tecnic Systems Inc have been building IoT applications and services since 2010. We provide FRED, cloud hosted Node-RED as a service to the community. We also offer a commercial version to our customers, as well as professional services. Learn more.
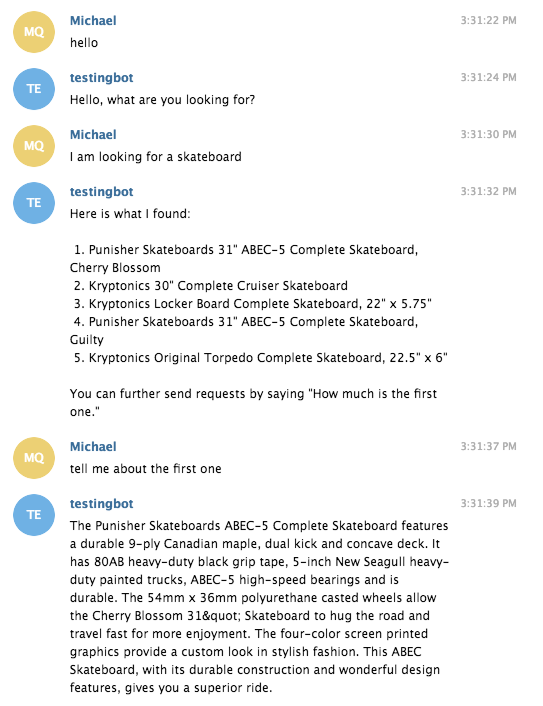
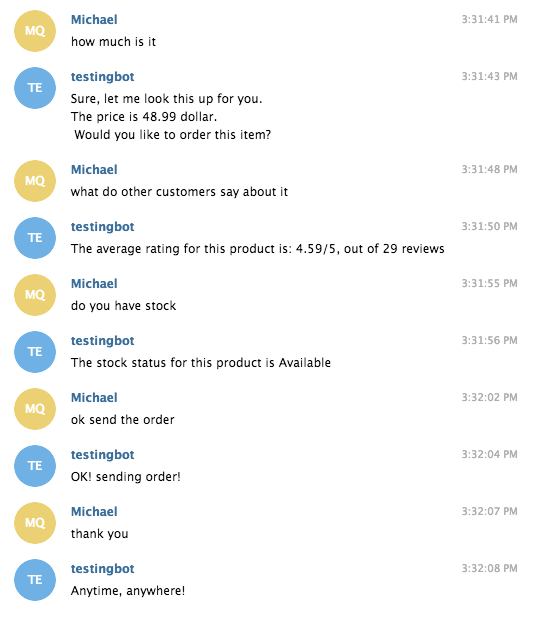
A local shop has decided to expand their online chatbot services for quick and easy access to their products. When customers initiate the conversation, they can ask the chatbot to recommend products by searching its database of products (which we mock-up using the Walmart online database). Users can further ask the chatbot about the price, product details, customer reviews, stock, and send orders online.
They decided to set this up by using FRED to implement a Node-RED back-end process, various messenger platforms (as front-end, we are using telegram in this case) and IBM Watson Conversation for the natural language interpreter, which interprets the natural language input from customers.

To create an AI chatbot as in this sample, you will need the following:
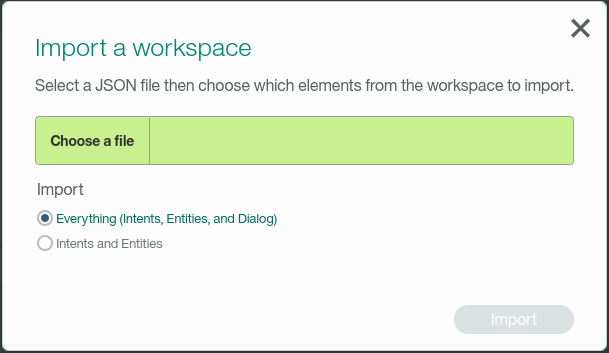
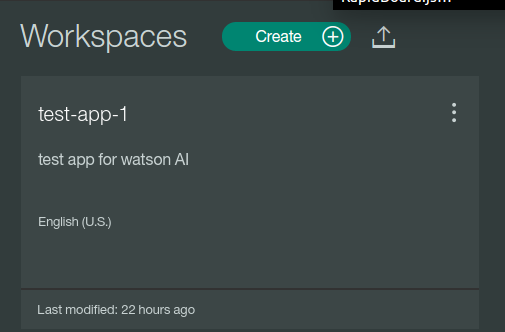
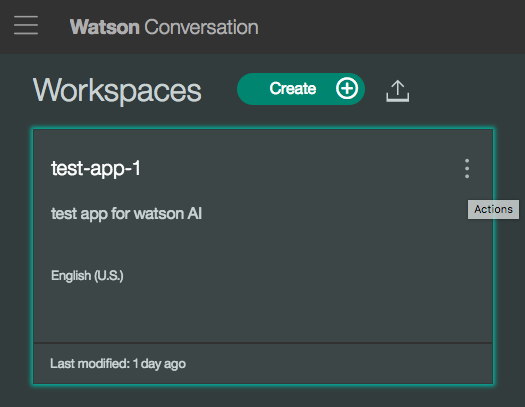
Once you have setup your IBM Watson account, you can go to the Watson Conversation workspace. We have prepared a sample JSON file for you here. You can simply import the sample application to get it working right away. We will briefly explain what this application does later on.
When you are in your workspace, you will see these at the top.

Click the Up arrow to upload a JSON file.
Once it is done. You will see this app in your workspace.
When you click this app, you will be able to see the contents in the app. There are three main tabs in this app, the Intents, the Entities, and the Dialog.
Normally, when you start a new conversation application, you need to train the Watson application to interpret users’ input and be able to match this input with the correct intents.
Since our goal is to set up a smart inventory inquiry chatbot, it is necessary for the bot to pick up all possible words that could be used in searching. We had done some data processing in the “category” field, with their possible synonyms in natural conversations. Don’t be scared by the amount of words. These words were taken from the Walmart taxonomy API.
Once you’ve uploaded the application, you will need to train your program with the data supplied. Watson should automatically starts the training process. You can check the status by clicking this button on the top right corner to open the dialog window:

and you will see Watson is training with the data you supplied:

It wouldn’t take long before you see this showing up indicating the training process is complete:
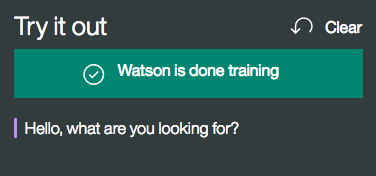
Once Watson finishes training the conversation application, we can leave it for now and move to the next step.
We are using Telegram as the messenger platform for this tutorial merely because is simple and quick to setup. In fact, you are more than welcome to use any messenger platforms you want as long as you can connect to FRED. Telegram has thorough instructions on how to setup a chatbot using Botfather here.
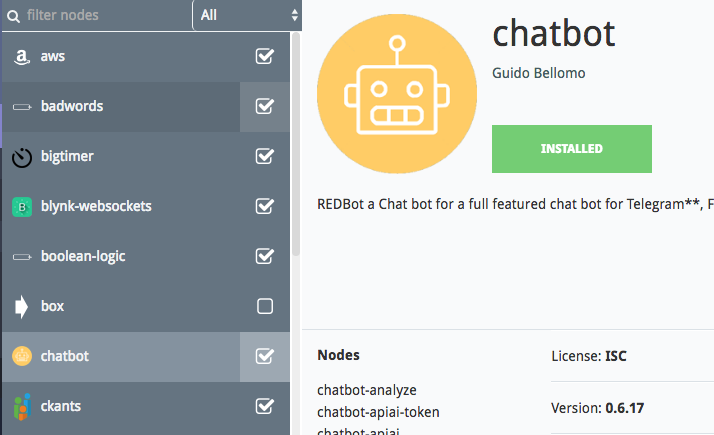
To connect the telegram chatbot to FRED, we will need to install node-red-contrib-chatbot to your FRED account. To do that, use the management panel on the left of the FRED UI, select Add or Remove Nodes and look for the chatbot node in the list of nodes FRED provides. Select it and install.
Then, we will drag the Telegram Receiver node and the Telegram Sender node onto the editor. Double click on one node, setup the bot information by entering the bot API key that you received when you created the chatbot on Telegram. If it all works out, you should see these nodes indicating that they are connected.
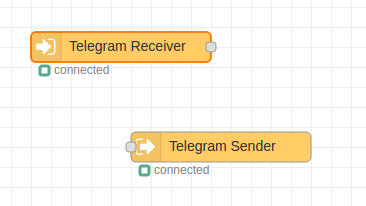
You can connect these two nodes, and start a conversation to this bot on Telegram. If you have set up correctly, you should see echo messages coming back on the Telegram messenger (receiver).
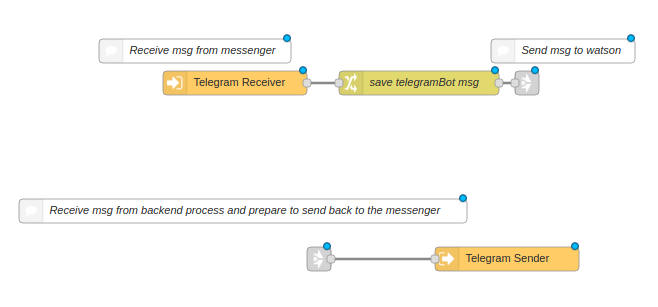
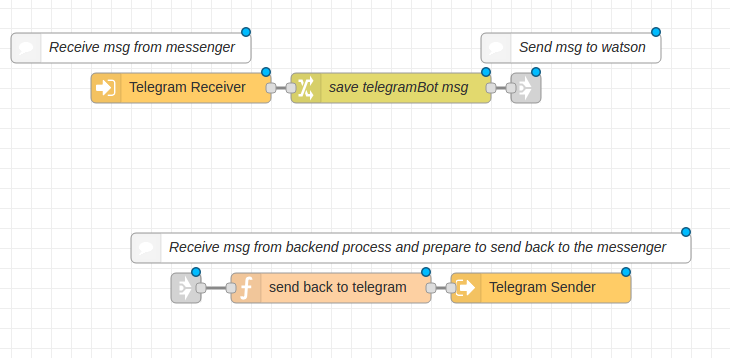
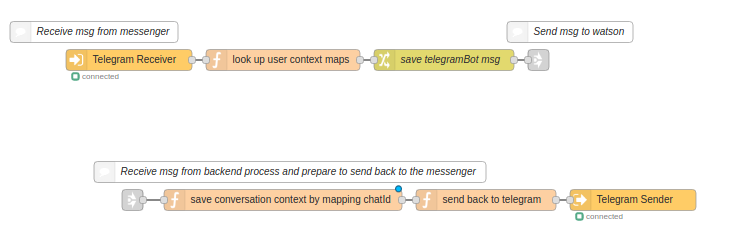
We are going to use multiple tabs in Node-RED for this application, and make use of the link node to connect flows between tabs. Let’s name this tab as Messenger to FRED, since it only contains nodes for communicating with messenger platforms. We will use link nodes to connect to other flows in other tabs. We will link the flows at the end.
We also want to keep the original message content from the Telegram Receiver node because it contains information that is required to send the message back to the users on Telegram. We will use a change node to save the telegram messages by setting msg.telegramBot to msg.payload.
So far, the setup should look like this:
Now the messengers are connected to FRED, we will continue to the next step.
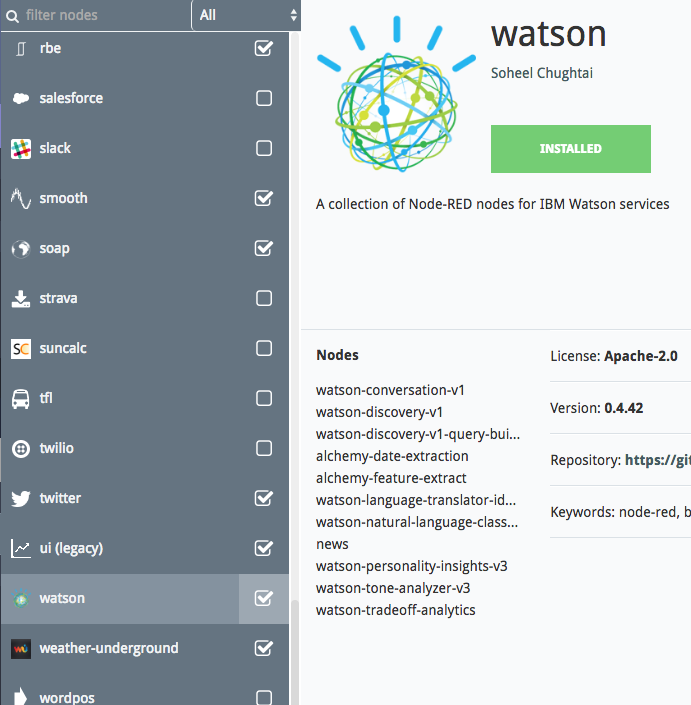
For this part, we will need to install node-red-node-watson. You can find this node in Add or Remove Nodes. This is a set of nodes developed by IBM that can connect to Watson services. (Note, this is a subset of the IBM nodes. We have ported and tested these on FRED since they weren’t designed to run in a shared cloud environment)
Let’s create a new tab in the editor called “FRED to Watson”.
Similar to the previous section, we will be using two link nodes to connect to other tabs. We will also need two change nodes and the Watson Conversation node that you just installed.

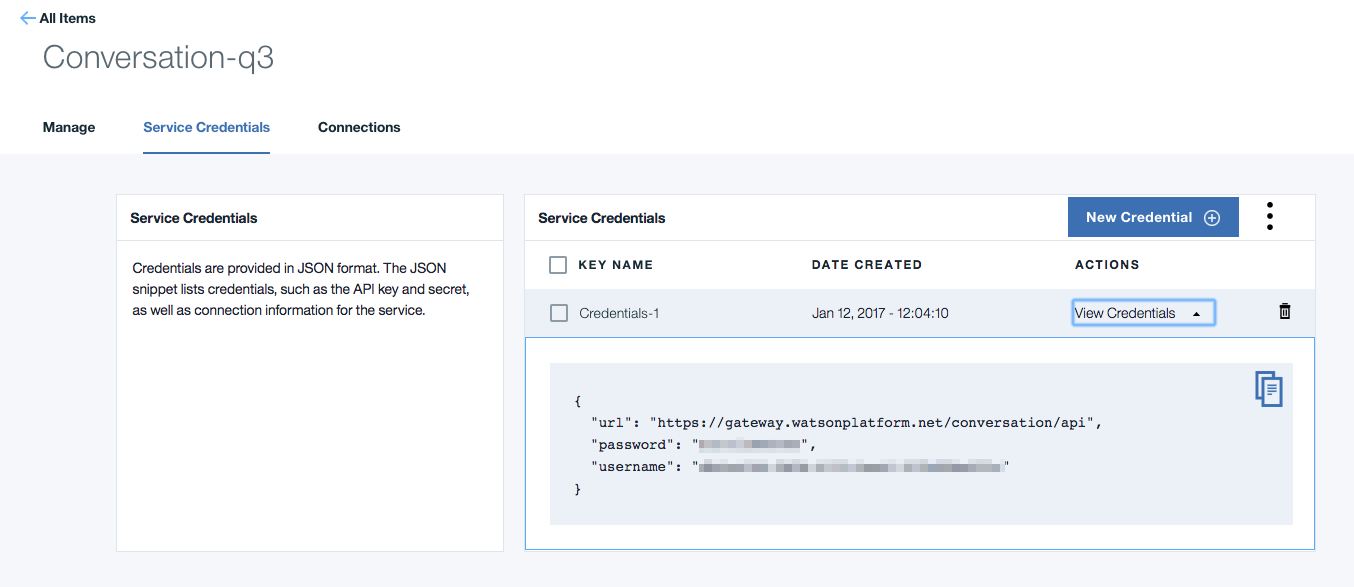
In the configuration tab of the conversation node, you will need some info from the Watson Conversation workspace. Let’s head back to Watson Conversation workspace.
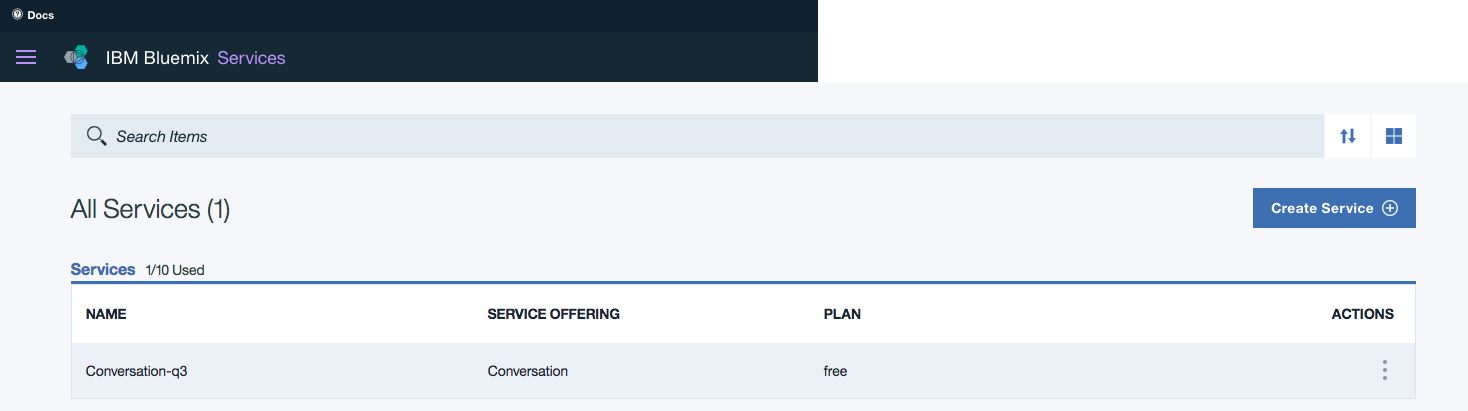
When you click the Actions button -> View details, you should see the Workspace ID, copy that down to the Watson Conversation node. Then, go to the Bluemix dashboard, click the conversation service in all service, then click the “service credentials” tab, you will be able to find the username and password to access your conversation app.
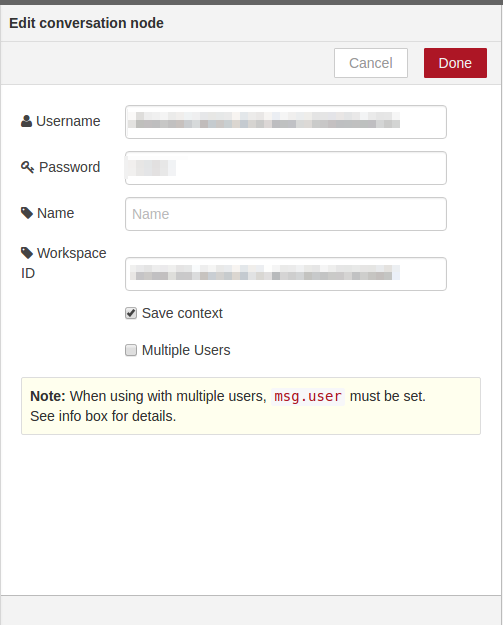
 And this is how the config tab of the Conversation node should look like:
The “prepare to send to watson” change node simply sets msg.payload to msg.telegramBot.content, so we can send the text content from Telegram to Watson. Then, we have the “save to watsonMsg” change node where we set msg.watsonMsg to msg.payload to save the output of Watson Conversation for further process.
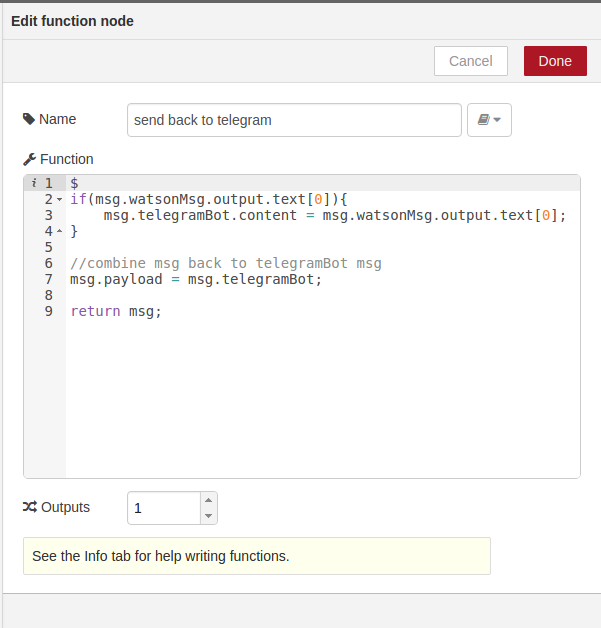
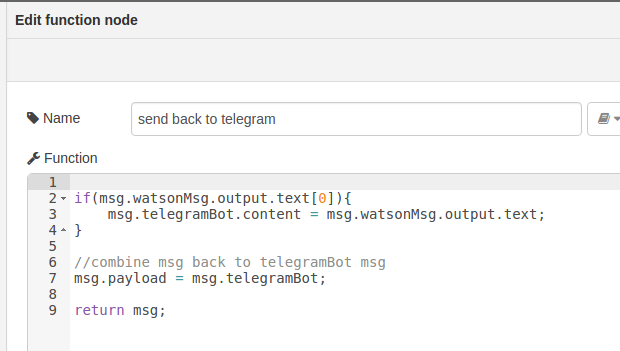
Now, back to the “messenger to FRED” tab, we also need to send the output from msg.watsonMsg back to the Telegram Sender node.
We will add one Function node in front of the Telegram Sender node, with the following content.
And the flow in “Messenger to FRED” should look like:
As you can see, we first merge the output from Watson Conversation to the Telegram message that we had stored earlier, and we finally set msg.payload to the Telegram message we have saved and send it to Telegram Sender node.
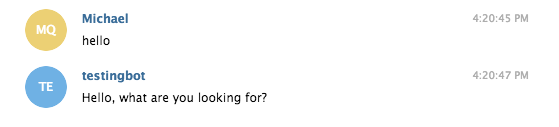
At this point, you have already connected the Telegram chatbot to Watson Conversation. If you connect these flows together, you should be able to get simple responses from Watson to Telegram:
Now comes the hard part. We want the chatbot to be able to perform certain tasks upon requests. In our user story, this chatbot is able to provide simple recommendations and check info such as availability, price and customer reviews. Since we are using the Walmart database API as a mock back-end database, let’s start a new tab call “FRED to Walmart API”.
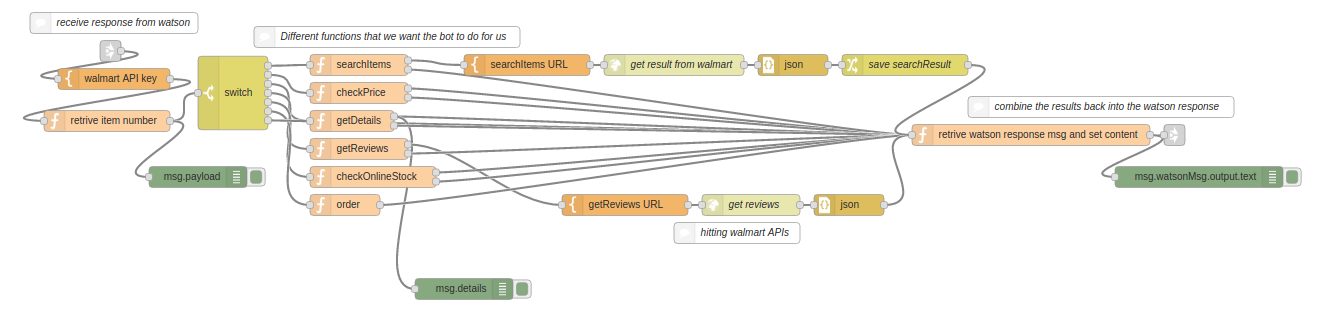
Again, we will have two link nodes that connect from the flow in the “FRED to Watson” tab and to the “Messenger to FRED” tab. We will set a Switch node to send the message to different function nodes according to the users’ intent. We will perform different tasks and combine the output back to msg.watsonMsg.output.text, which will be merged into msg.telegramBot and sent back to Telegram later on.
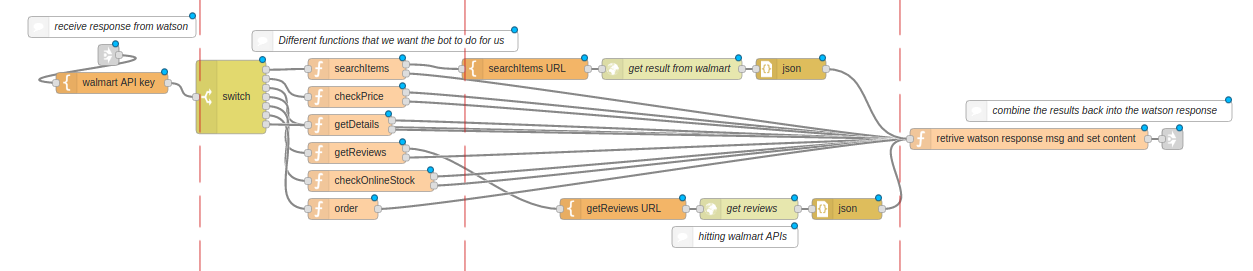
As you can see from this diagram, we have set four stages in this example. The first stage is to get the response from Watson, and we add the Walmart API key that we got from the Walmart database API. The second stage is where we inspect the Watson response and send it to different function nodes according to the intent. For example, if the intent is “searchItems”, the function node “searchItems” will go through the entities array from the Watson response, and generate msg.url for the HTTP request node. The third stage is to call the database APIs. The last stage is to combine the result back to msg.watsonMsg, where it will be further processed later on.
You can import these flows from the sample code provided on our Github. If you are not sure how to import flow codes, please refer to: here.
Also, if you have been following the tutorial, we need to make a small modification to the “send back to telegram” node in the “messenger to FRED” tab because we had modified the message in “FRED to Walmart API” tab. The updated code for “send back to telegram” node would look like this:
In general, the second and the third stage is where you design the functionality of your chatbot. You are more than welcome to design your own features.
At this stage, you have a basic, simple chatbot that uses the watson functionality to understand natural language. This is already pretty impressive ….
But, a smart chatbot should also know the context!
However, the chatbot we have so far can only respond to the current input from users. Although it can handle multiple user inputs, it still cannot relate the input to the overall conversation context. We need to do this if we want to make our chatbot “smart”.
The general idea in this section is to show you how we can use FRED to keep context of the conversation. In this sample, there will be a few spots that we need to save the data on FRED.
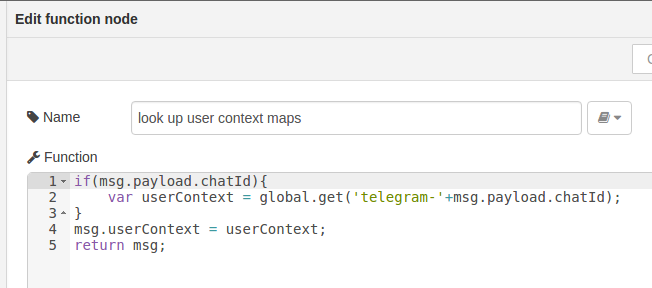
First, let’s save the message context for each user. Let’s go to the “Messenger to FRED” tab, and add a function node before sending out the message to Telegram sender node. The purpose of this node is to save the context on local mapping to the chatId that was shown in the Telegram message. If you have a lot of data flowing, you can also save the context to a database (See our tutorial on using SQL lite).
Here is how we save the context

You will also need a node to pull out this saved context when message was sent in from telegram, we can add this node:
So, the flow in “Messenger to FRED” would look like this:
We can leave the “FRED to Watson” tab as it is. We will need to add some more nodes in “FRED to Walmart API” tab.
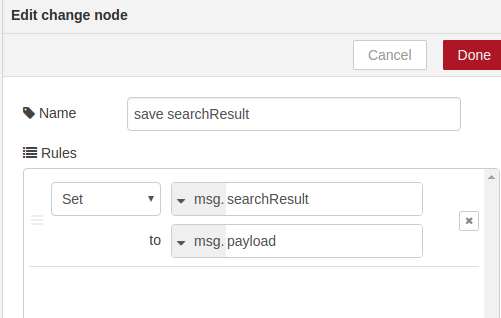
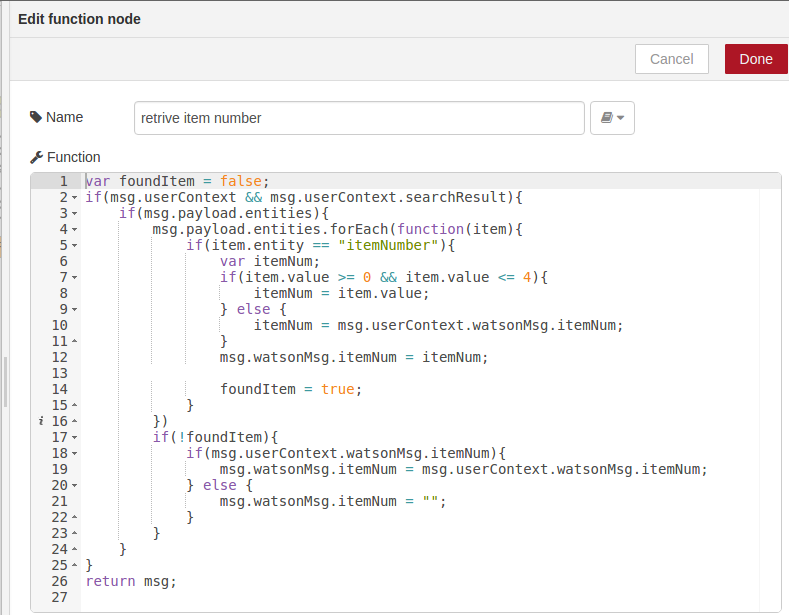
As you had seen in the sample conversation above, we sent out a menu from the chatbot, and the user refers to the item on the list. In order to maintain the status, we would want to keep a record of the item number and also the item search result.
We first add a function node after calling the search items API to save the search result.
We also add a function node before the switch to get the item number:
and now the flow would look like:
Now if you connect all the flows, you would have an AI chatbot that can handle multiple users and maintain conversational context!
Ok, that’s it – it’s quite a complex tutorial, but we think you’ll agree, the resulting chatbot is very impressive. What’s more, this basic example can now be modified to adapt to your specific needs – have fun!
About Sense Tecnic: Sense Tecnic Systems Inc have been building IoT applications and services since 2010. We provide FRED, cloud hosted Node-RED as a service to the community. We also offer a commercial version to our customers, as well as professional services. Learn more.
This tutorial shows you how to use FRED — a cloud based Node-RED — to connect to the General Electric’s Predix platform and use the Timeseries microservice. We make use of a new node we’ve created, node-red-contrib-predix-timeseries, on the FRED cloud-hosted Node-RED service. Continue reading “Tutorial: Using FRED (Cloud Node-RED) with the GE Predix Timeseries Microservice”
This tutorial shows you how to use FRED — a cloud based Node-RED — to connect to the Samsung Artik hardware modules for remote control and visualization. We make use of the node-red-contrib-artik and node-red-contrib-fred nodes on the Artik board and on the FRED cloud-hosted Node-RED service. Continue reading “Tutorial: Controlling an Artik board using FRED and Node-RED”
This guide will show you how to make use of an SQLite database using the litedb node on the FRED hosted Node-RED platform to create database tables and store data. Under the hood, the litedb node uses SQLite. As a very lightweight relational database, Continue reading “Tutorial: Using SQLite with FRED (Node-RED)”
A lot of Node-RED developers want to use Node-RED on their devices (Pi, Artik, Edison etc) and also in the Cloud. FRED provides a cloud hosted Node-RED so it’s natural to want to connect your device flows to your FRED Continue reading “Tutorial: Connecting device Node-RED to cloud Node-RED”
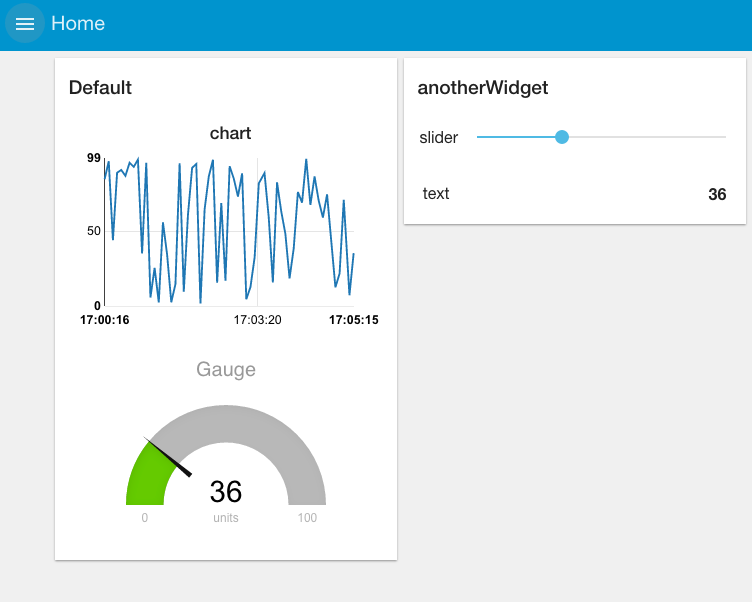
This is a simple example of reading and visualizing data using the new UI nodes from node-red-dashboard. We’ll be using the Cloud based FRED service as our Node-RED engine and visualizing a simple random data feed to show how to create a simple dashboard that looks like this:
NOTE: For existing FRED users – This is the new version of the UI nodes that many of you might be already using. The old version of UI nodes are still available(and it is still named as “UI nodes”, but the link to the old UI dashboard is changed to “/red/legacy_ui/“.
The sample flow of this tutorial can be found in this link.
Other approaches
If you are looking for more ideas on how to create dashboards using Node-RED, check out the dashboard lecture in our lecture series. It explores three approaches to dashboards – this approach which uses the built in dashboard nodes, the use of a third party dashboard tool – freeboard. And a generic approach that uses a javascript charting library and the http in/out nodes. All lectures are available at: http://noderedguide.com/
Node-RED is a visual tool for wiring the Internet of Things developed by IBM Emerging Technology and the open source community. Using Node-RED, developers wire up input, output and processing nodes to create flows to process data, control things, or send alerts. It works by allowing you to wire up web services or custom “nodes” to each other, or to things, to do things like:
If you’re new to Node RED you might find our Introduction to Node RED tutorial very helpful.
Front End for Node-RED (FRED) manages instances of Node-RED for multiple users in the cloud. We manage and optimize your instance of Node RED so you worry about accomplishing your project, not setting up and maintaining your Node-RED instance.
To begin our tutorial create your own Node-RED instance in the cloud. Register for a free account at http://fred.sensetecnic.com.
After registering make sure to activate your account via your email. You will not be able to login until you validate your account.
About Sense Tecnic: Sense Tecnic Systems Inc have been building IoT applications and services since 2010. We provide FRED, cloud hosted Node-RED as a service to the community. We also offer a commercial version to our customers, as well as professional services. Learn more.
Let’s start by looking at the node-red-dashboard nodes and getting a simple dashboard setup.
To start, let’s wire up a simple flow that sends a random number between 0 and 99 to a simple chart. For that you’ll need an inject node to repeatedly fire every few seconds, a function node to generate the random number and one of the node-red-dashboard nodes – in this case the chart node.
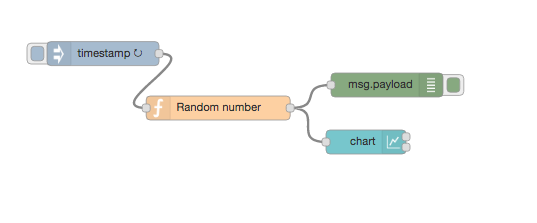
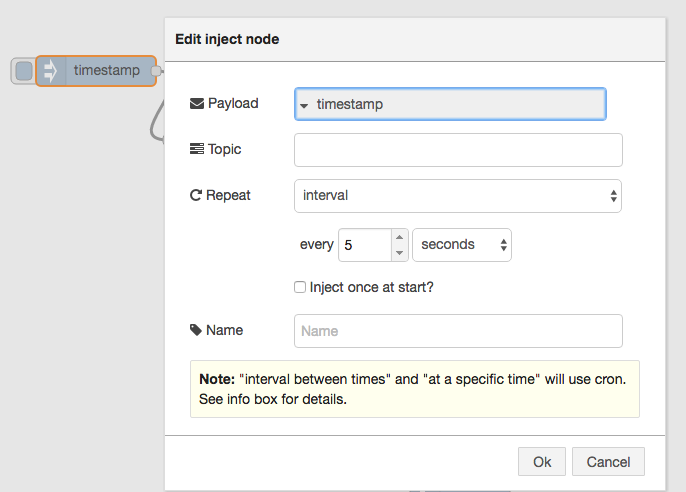
Before we look a how the chart node works, let’s configure the inject node to send a timestamp every 5 seconds by setting the payload to timestamp and the repeat field to an interval of 5 seconds.
This will act as our repeating trigger. Now we need to set up the function node to generate a random number – we’ll use a simple JS math function to do this:
msg.payload = Math.round(Math.random()*100);
return msg;
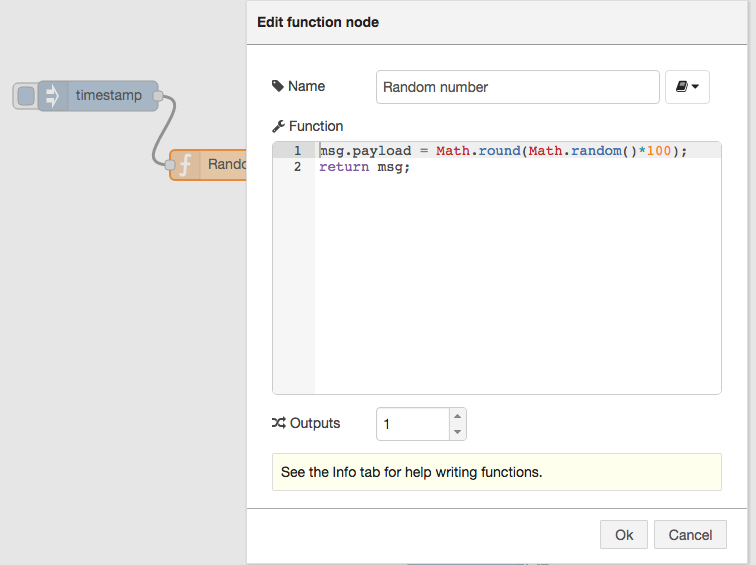
That will generate a random number between 0 ~ 99 which is passed to the chart node.
So now let’s take a look at the chart node. When you double click it, you’ll see it’s configuration options: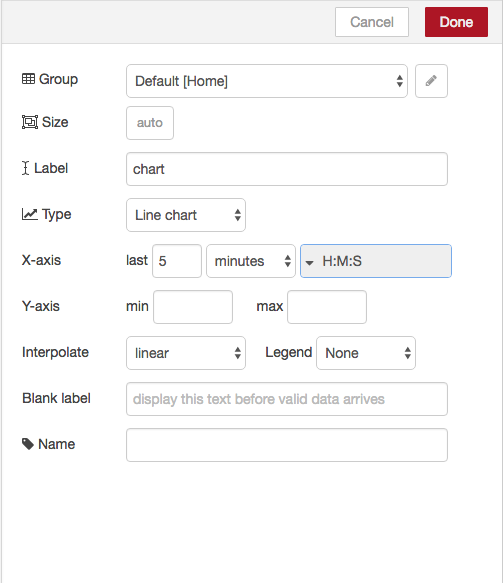
If you click on the button of the Group field, you will be prompted to configure the tabs of the UI.
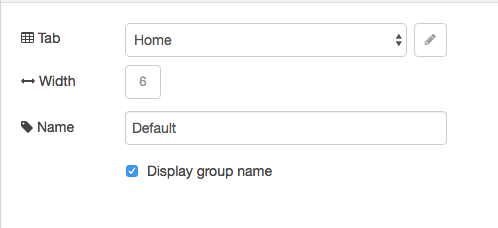
The Tab option allows you to specify which tab of the UI page you will see the UI element on – in this case our chart. The default tab is Home – which we are using here. If you select the edit button to the right of the Tab field you can create a new tab and then select that. However, we’ll use the default home for now.
The Name field is the standard Node-RED node name – by default this is chart but you can set it to anything you like.
The Group field allows you to group UI elements – we’ll show you how that works when we add another UI element so let’s use group “Default[Home]” for now – of course, you can use any string you like.
The X-asis field allows you to tell the chart how much data it should store and display – the longer the ‘last‘ filed is set to, the more data is stored and displayed by the chart. Let’s use a short 5 mins which will start to throw away the data that is 5 minutes old.
Lastly the Interpolate field defines how the chart will interpolate values in between actual data values it receives, you can select between linear, step, b-spline and cardinal – which are standard interpolation algorithms. We’ll use the default linear.
Wire these nodes up, hit the deploy button – check that your debug node is showing that random values are showing. Then head over to your default dashboard page to see the results. By default, under FRED, you’ll see your UI at:
https://{username}.fred.sensetecnic.com/api/ui/
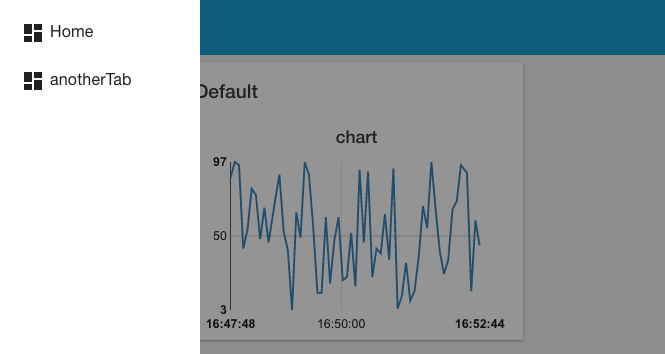
When you visit that page you’ll see your initial chart as shown below:
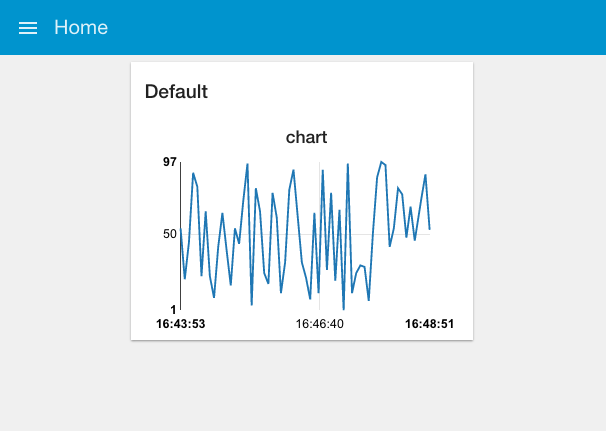
As you can see, you get a nice line chart, scaled for your data values (X axis) and the time they arrived (y axis). You can also see “Default” at the top left of the chart, indicating this is UI group “Default” – which is the group name we set in the configuration fields for the chart node.
If you look at the top left of the web page, you can see that we are, by default, on the home tab. If you had created your own tab then when you click the selector top left you’ll get a pull down menu of your tab options:
That was pretty simple, let’s add a few other UI elements to our dashboard. Firstly let’s create a gauge to show the last data value sent. Drag a Gauge node from the UI palette and wire it to the Random Number function node.
Then double click to open up and let’s configure it:
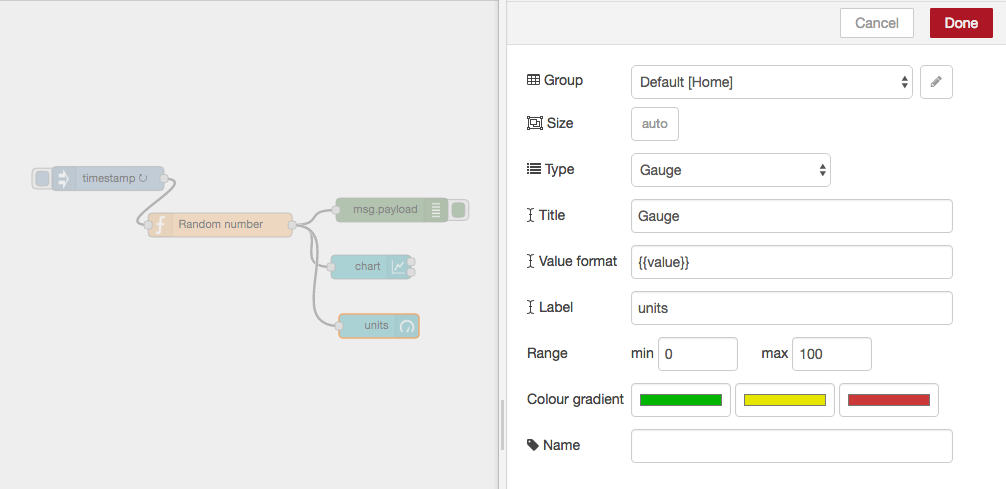
We’ll us the same Tab, home and we’ll also add it to the same group – “Default[Home]”. The Min and Max fields allow you to set the min and max values the gauge will shown. Make sure the max is set to 100 which is the most that the random number function node will generate. You can also change the Colour gradient to show different colours on the widget, but we will leave it as default for now.
Hit deploy and then head over to your dashboard and you’ll see that the chart and gauge are displayed in a group with the chart now showing the last 5 minutes of data and the gauge the latest value.

As a last example, let’s use a couple of the other UI nodes, a slider node and a text node to show the same data on a slider and as a text string.
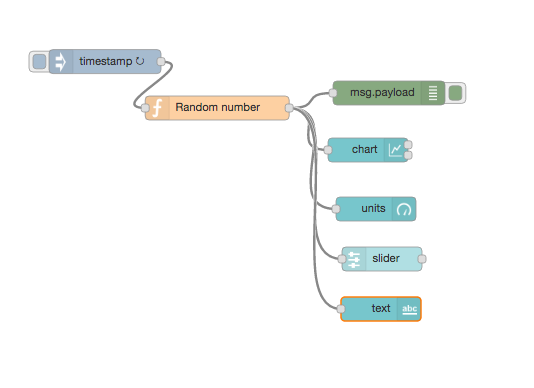
For these two nodes, configure them to use the same tab – “Home” but use group name “anotherWidget”(You will need to click “Add new UI_group” from the drop down menu of the Group field, and then click the edit button). You will also need to change the min and max value for the slider node to show the correct position of the slider. Deploy those and let’s take a look at your dashboard. As you can see, we now have two widget groups, group “Default” with a chart and a gauge, group “anotherWidget” with a text filed and a slider. Simple eh?
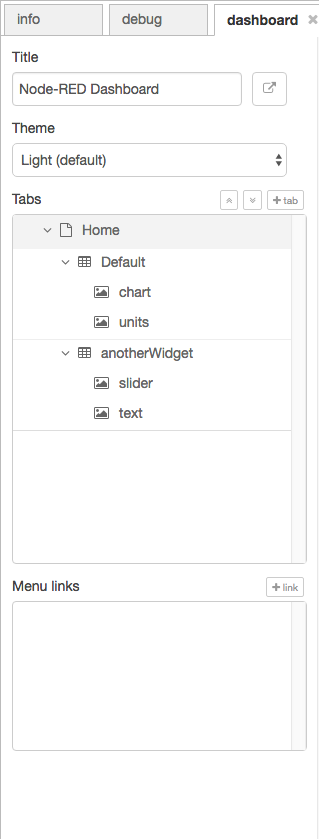
In the dashboard tab beside your debug tab, you can also set the theme and order of the elements. If you don’t see the dashboard tab, click the menu button at top right corner, then select “View” -> “Dashboard”. You can see all the widgets and tabs showing in a tree structure, and you can easily drag the elements to change the orders that they are presented in the dashboard.
Now you’ve got the basics sorted out, play around with the different dashboard elements to build your own dashboards using some real world data – have fun!
If you are looking for more ideas on how to create dashboards using Node-RED, check out the dashboard lecture in our lecture series. It explores three approaches to dashboards – this approach using the built in dashboard nodes, the use of a third party dashboard tool – freeboard. And a generic approach that uses a javascript charting library and the http in/out nodes. All lectures are available at: http://noderedguide.com/
About Sense Tecnic: Sense Tecnic Systems Inc have been building IoT applications and services since 2010. We provide FRED, cloud hosted Node-RED as a service to the community. We also offer a commercial version to our customers, as well as professional services. Learn more.
In this guide you will learn how to use websockets in an HTML app. We will use FRED (cloud hosted Node-RED) to create a great chat application that uses websockets and does some simple message analysis. Continue reading “How to Build a Great Chat Application With Node-RED and Websockets”
This tutorial is a basic introduction to the basics of Node RED. You will learn about node inputs, outputs, messages, deploying and debugging a Node RED flow. Continue reading “Introduction to Node RED”
In this guide you will learn how to control (turn them off or on) things based on data using Node RED on a Raspberry Pi. You will learn how to turn a fan on or off using a relay when the weather temperature raises above a level. Continue reading “How to Control Almost Anything With a Raspberry Pi 2 and Node RED.”
In this guide you will learn how to connect your Raspbery Pi 2 to IFTTT.com via their Maker Channel. We will create a physical button that when pressed will log data to Evernote. We will use Node RED to program our Raspbery Pi, WoTKit for real-world data, and IFTTT to connect things together. Continue reading “How to log Data by Pressing a Button on a Raspberry Pi, Using IFTTT, Node RED and Evernote.”
This guide will teach you how to post data to a Dweetio Thing using Node RED (FRED).
The sample flow can be found in: http://tutorial-samples/post-data-to-dweetio-using-fred/post-data-to-dweetio-using-fred.json Continue reading “Post Data to Dweet.io using FRED”
In this guide you will learn how to implement a simple outlier analysis to find values in an array that are outside of the norm. This is very useful when trying to detect anomalies in data sets. We will implement a Node-RED function that uses inter-quartile outlier analysis Continue reading “Anomaly Detection Using Node-RED”
In this guide you will learn how to create a Node-RED to monitor the weather and send a tweet when the skies are clear. Continue reading “A Node-RED flow to Monitor the Weather”
In this guide you will learn how to import a node Node-RED flow.
Node-RED is a visual tool for wiring the Internet of Things developed by IBM Emerging Technology and the open source community. Using Node- Continue reading “How to Import a Node-RED Flow.”
In this guide you will learn how to create a simple Node-RED flow that uses the “inject” and “debug” nodes. Continue reading “How to Create a NODE-RED flow.”
This is a simple example of reading and visualizing data using the FreeBoard node from a Node-RED flow. We’ll be using the Cloud based FRED service as our Node-RED engine and visualizing data from a web weather service . Continue reading “A Node-RED Dashboard using FreeBoard”