
This guide will show you how to make use of an SQLite database using the litedb node on the FRED hosted Node-RED platform to create database tables and store data. Under the hood, the litedb node uses SQLite. As a very lightweight relational database, SQLite does not need complex setup procedures, making it an ideal database management system to use for embedded systems and rapid prototyping.
Because FRED is a shared service, the litedb node limits your use of SQLite in a couple of ways:
- There is no way to specify the database file. Your FRED instance only uses a single SQLite database.
- The SQLite database file on FRED is limited to 4mb
Keep in mind that, although there is a limit of 4mb, you are still able to create as many tables as you want up to the size limit. With the sample table that we created for this tutorial, the 4mb database file is able to hold approximately 140,000 records. For more information on SQLite see More documentation can be found on https://sqlite.org/.
Sample flows for this tutorial is also available in here: SQLite with litedb node on FRED
What is Node RED?
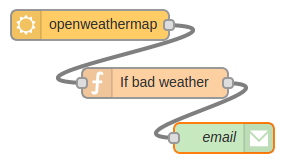
Node-RED is a visual tool for wiring the Internet of Things developed by IBM Emerging Technology and the open source community. Using Node-RED, developers wire up input, output and processing nodes to create flows to process data, control things, or send alerts. It works by allowing you to wire up web services or custom “nodes” to each other, or to things, to do things like:
- Send an email on a rainy weather forecast.
- Push sensor data to services like Twitter.
- Perform complex analysis on data with ease.
If you’re new to Node RED you might find our Introduction to Node RED tutorial very helpful.
What is FRED
The Front End for Node-RED (FRED) manages instances of Node-RED for multiple users in the cloud. We manage and optimize your instance of Node RED so you worry about accomplishing your project, not setting up and maintaining your Node-RED instance.
About Sense Tecnic: Sense Tecnic Systems Inc have been building IoT applications and services since 2010. We provide FRED, cloud hosted Node-RED as a service to the community. We also offer a commercial version to our customers, as well as professional services. Learn more.
Create a FRED Account
To get started, create your own Node-RED instance in the cloud. Register for a free account at http://fred.sensetecnic.com.
After registering, make sure to activate your account via your email. You will not be able to login until you validate your account.
Installing the litedb node
First, you will need to ensure that you have installed the litedb node since it is not installed by default in FRED. After you register for FRED, or after you login, you will be presented with the FRED dashboard.
In the management panel, click “Add or Remove Nodes“, and find the litedb node.
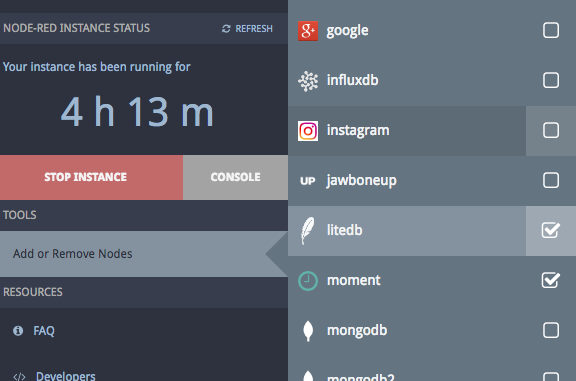
Make sure the litedb node is installed for your instance. If the box beside ‘litedb’ is empty in your Nodes list, just simply check the box and restart your instance.
Make sure you start your instance by hitting the start button. If it is already started, stop, and start it to ensure the new litedb node is available. Create a new tab to start with an empty canvas.
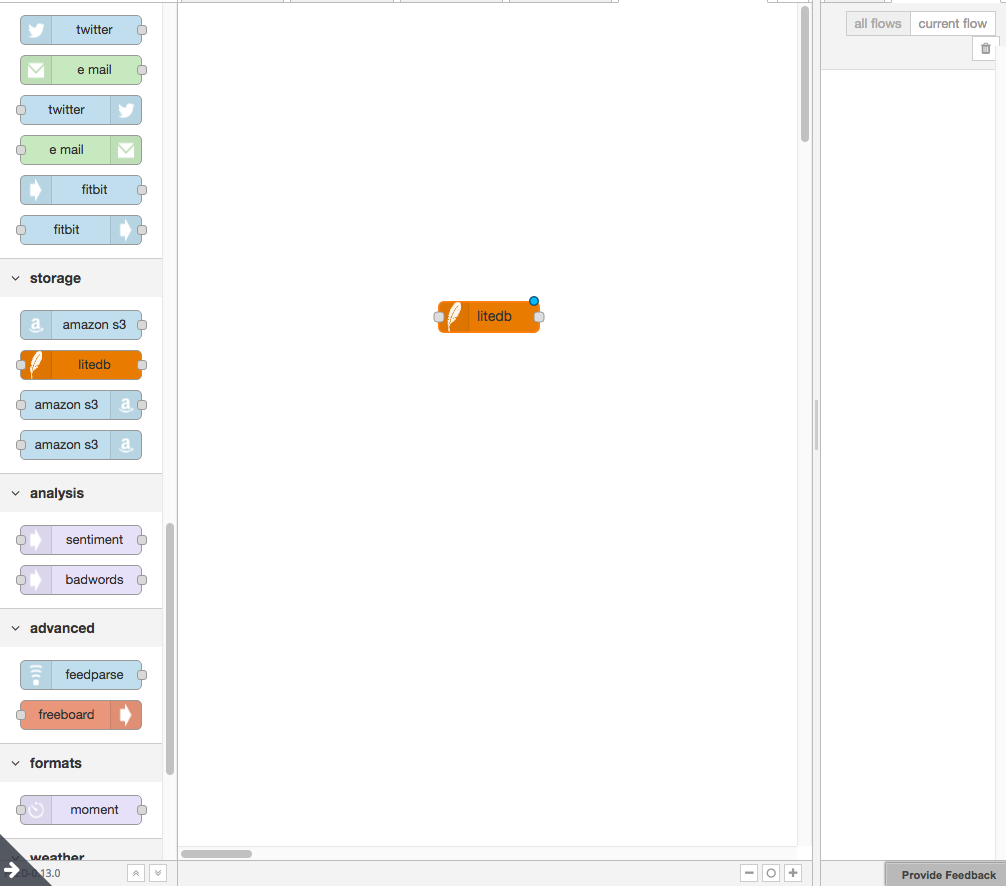
Once the litedb node is installed, you should see the litedb node in your left panel. Drag a litedb node to the empty canvas, and we are ready to move on. You can also name the litedb node however you like by double clicking on the node to open the configuration dialog if you like.
For demo purposes, we are going to create a table and inject random numbers at a constant time interval. We will also look at how to view and manage this data later on.
Creating your first table
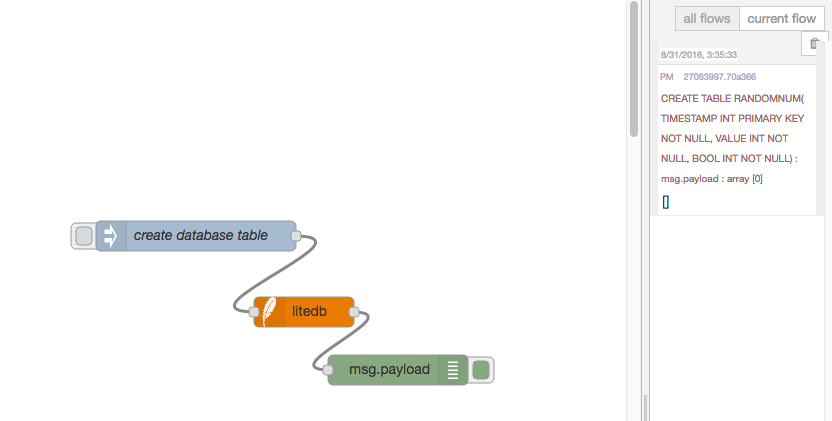
As documented on the info tab of litedb, the node takes in SQL queries in the input msg.topic, and then returns responses in the output msg.payload. To create a table to store some data, all we need to do is send the appropriate SQL command to the litedb node. A simple way to do that is to connect an inject node to the litedb node with the following settings:
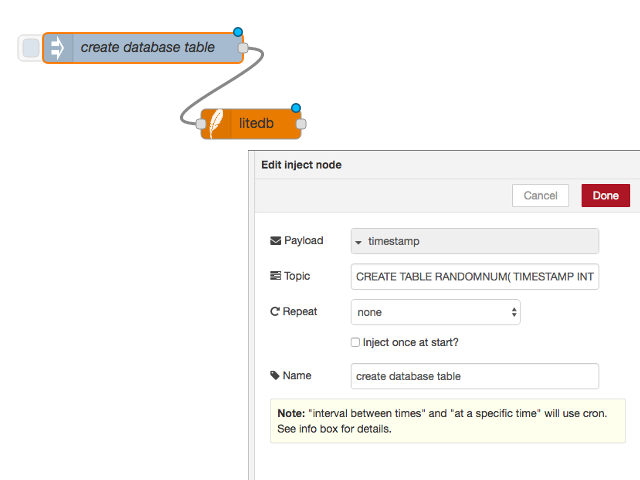
where in the topic field, we have the query
CREATE TABLE RANDOMNUM( TIMESTAMP INT PRIMARY KEY NOT NULL, VALUE INT NOT NULL, BOOL INT NOT NULL)
As you can see, this demo table is called “RANDOMNUM“, and it has three columns, TIMESTAMP( Primary key column ), VALUE, and BOOL. (We will use BOOL to store an attribute which indicates if the number is larger than 50 or not) These three columns are all set to NOT NULL and with type INT.
Once you are done, connect a debug node to the litedb node, and deploy the current settings. Hit the inject button, and you should see that RANDOMNUM is created.
Inserting Data
We can use the same method to send an SQLite query to the database to inject a new value into the table.
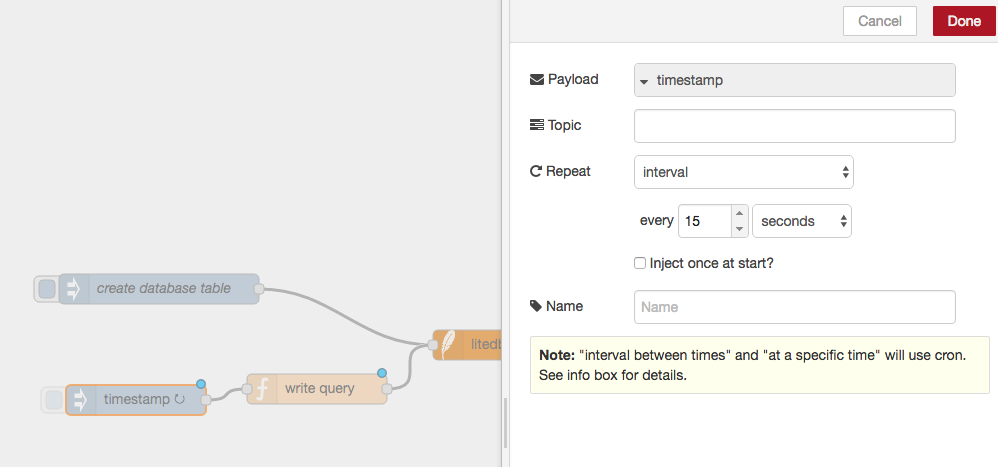
Let’s set up another inject node that injects a new timestamp every 15 seconds simulating a sensor event. Followed by a function node, we will write a query with the input of the timestamp, and send the insertion query to the litedb node.
First, drag a new inject node, and add these settings.
then, let’s connect this timestamp node to a function node.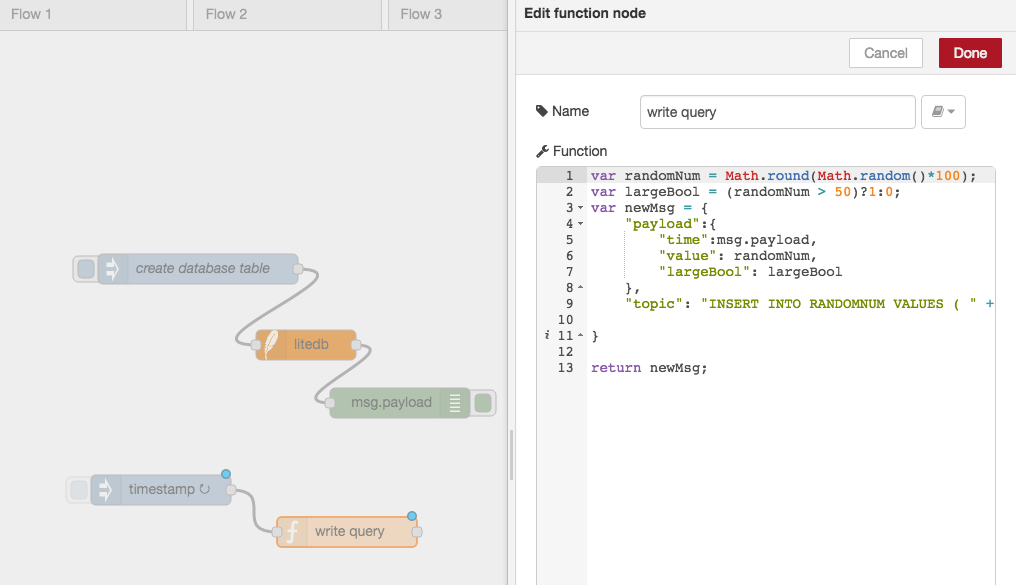
We name the function node “write query” and we define the code inside the function node would be as follows:
var randomNum = Math.round(Math.random()*100);
var largeBool = (randomNum > 50)?1:0;
var newMsg = {
 "topic": "INSERT INTO RANDOMNUM VALUES ( " + msg.payload + ", " + randomNum + ", " + largeBool + ")"
}

return newMsg;
In the above code, a new record is inserted into RANDOMNUM with a timestamp as its primary key, a randomly generated value (ranged from 0 to 100), and a boolean value as if the number is larger than 50. Notice that there is no actual boolean data type in SQLite, so we represented boolean as either 0 or 1.
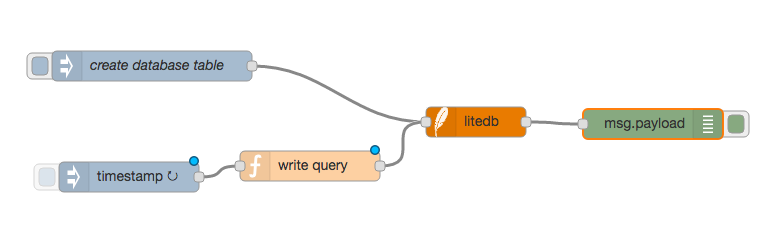
Then, we can just connect the function node to the litedb node as follow. Once you hit deploy, the inject node will start inserting new records to the table.
Selecting from database
To see the records from our table, we can set up another new inject node, with this in the settings:
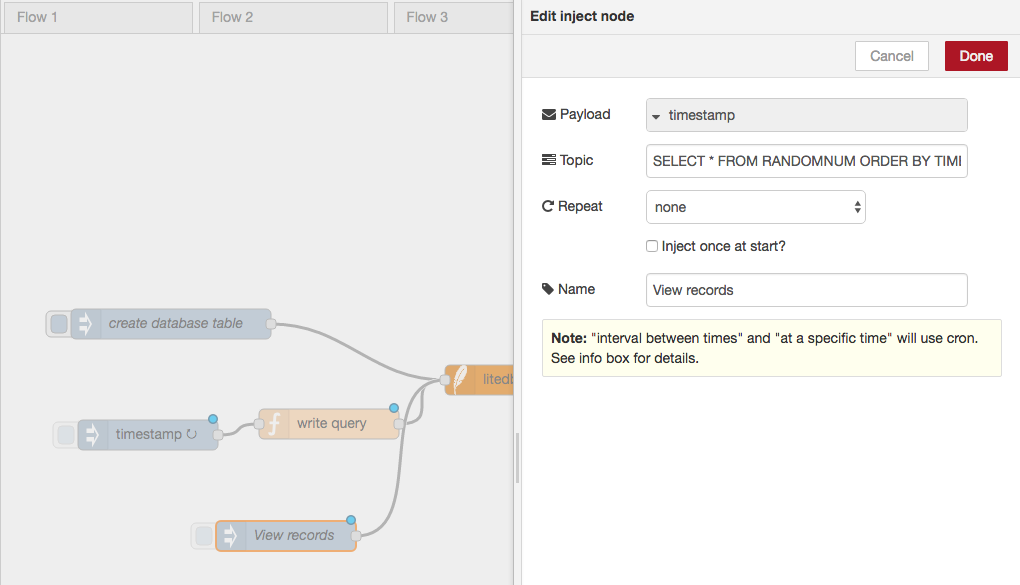
where the Topic field is
SELECT * FROM RANDOMNUM ORDER BY TIMESTAMP DESC LIMIT 100;
As you can see, we are showing the first 100 records in table RANDOMNUM ordered by the TIMESTAMP column in descending order.
After you deploy the nodes, and inject the SELECT query command, you should see something like this as the output of the debug node:
Controlling the size of your database
If you follow this guide, you will notice how we set up an inject node that injects records in 15s intervals. In real world scenarios, the database grows in size and may eventually affect the performance of servers. In addition, and as mentioned above, the litedb node has a limit of 4Mb in size. Here we will show you an example of how to delete older records that you do not want to keep.
We will set up another new inject node, and call it ‘delete’. For this example, it will run the delete query every minute, to remove the data that is older than 1 hour.
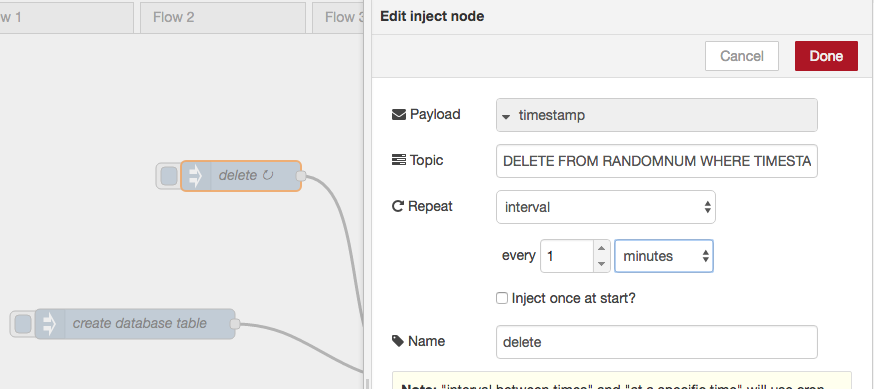
where the query in Topic field is
DELETE FROM RANDOMNUM WHERE TIMESTAMP <= strftime('%s','now', '-1 hours')*1000
Notice that, the timestamp generated from the inject node is UNIX epoch time in milliseconds, but the default timestamp return from the SQLite function strftime() is in seconds. That’s why we need to multiply 1000 at the end.
As you can see here, we use a modifier, ‘-1 hours’, to specify the time interval of data that we want to keep. In our case, this inject query means that we want to clean data that is one hour old every minute. We choose 1 hour in this case just for demo purpose. You can use different modifiers to suit your application, more info on the function strftime() and the modifiers can be found in: https://www.sqlite.org/lang_datefunc.html
While you are trying this deletion node, you can also set up an inject node to count the size of the table with this query
SELECT COUNT(*) FROM RANDOMNUM
Don’t forget to connect the inject nodes to the litedb node in order to send the query command into SQLite!
Now sit back and see how the node clears out the old data for you in the debug tab.
Visualizing data
Users are able to visualize the data by using the dashboard nodes. You can refer to the tutorial in A Node-RED dashboard using node-red-contrib-dashboard for more information on how to do this. In this tutorial, we will show you another trick to visualize the data in a table form.
From the previous exercises, we know that when we send
into the litedb node, it returns an array of records in the response, we can simply use the ui template node to parse the information we want.
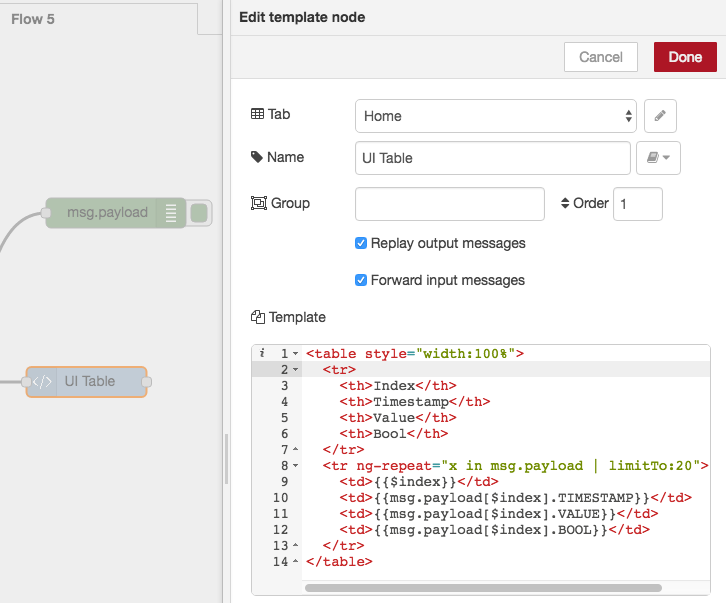
For example, we would like to have a table showing the first 20 records, just simply connect the template UI node to the litedb node:

in the template node, enter the following code:
<table style="width:100%">
  <tr>
    <th>Index</th>
    <th>Timestamp</th>
    <th>Value</th>
    <th>Bool</th>
  </tr>
  <tr ng-repeat="x in msg.payload | limitTo:20">
    <td>{{$index}}</td>
    <td>{{msg.payload[$index].TIMESTAMP}}</td>
    <td>{{msg.payload[$index].VALUE}}</td>
    <td>{{msg.payload[$index].BOOL}}</td>
  </tr>
</table>
and it looks like this in the config tab:
This code simply generates a table in HTML, and places the index, TIMESTAMP, VALUE and BOOL fields from msg.payload into the appropriate cells of the table. It then repeats for the next 19 records (using ng-repeat & limitTo). You can set up the table however you like. Once you deploy the nodes, the UI template node will update the table whenever SELECT * is sent to the litedb node, and an array of records are returned from the litedb node to the UI template node. The resulting table would look like this when you hit the URL https://{REPLACE-WITH-YOUR-USERNAME}.fred.sensetecnic.com/api/ui:

If you are interested in finding more about visualizing data from the database, please refer the guide A Node-RED Dashboard using FreeBoard or Tutorial: A Node-Red dashboard using node-red-contrib-ui
This covers basic usage of the litedb node. Although the example in this guide just stores random generated numbers into the database, you can grab data from any data source and insert it into the database, and query it any way you like. For more information on specific SQLite queries, see https://www.sqlite.org/lang.html