
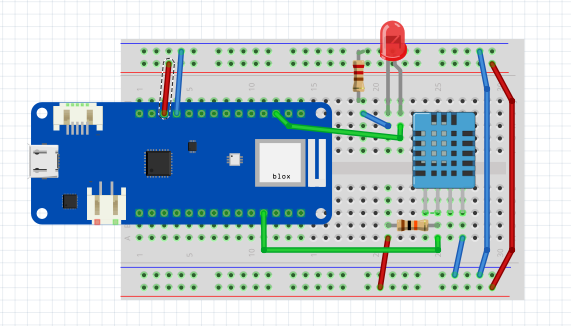
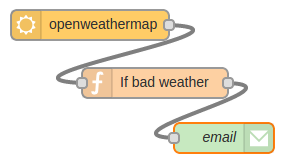
Augment an Arduino-based weather station with external service notifications using the FRED Cloud-hosted Node-RED service.
This tutorial has been moved to our main Node-RED site:
Augment an Arduino-based weather station with external service notifications using the FRED Cloud-hosted Node-RED service.
This tutorial has been moved to our main Node-RED site:
Adding a cloud Node-Red service to Ubidots for extra processing capability
Using motion sensor data to control home heating
This tutorial is an example of using the FRED (Cloud Node-Red) service to augment Ubidots with some more sophisticated cloud processing. It solves a need that some users may have when using Ubidots, i.e. keeping state and aggregating multiple data sources. In this tutorial, we will be sending data from a PIR motion sensor, connected to a wifi-enabled particle proton. Of course you can use any sensor device you wish.
Node-RED is a visual tool for wiring the Internet of Things developed by IBM Emerging Technology and the open source community. Using Node-RED, developers wire up input, output and processing nodes to create flows to process data, control things, or send alerts. It works by allowing you to wire up web services or custom “nodes” to each other, or to things, to do things like:
If you’re new to Node RED you might find our Introduction to Node RED tutorial helpful.
Once you are ready to go – let’s take a look at the overall setup of the demo. In the diagram below, you can see the overall flow of data. When movement is detected by the PIR motion sensor, it is passed to the particle board, and then sent over WiFi via the Particle.io service, to the Ubidots cloud.

When data arrives in Ubidots, the data is also pushed out to FRED (via MQTT) where it is processed. When FRED has finished, the data is sent back to Ubidots, and can then be used to update a Ubidots dashboard where it is graphed.
Our use case for this setup is heating control in the home. We wish to turn on the heating in the house when several rooms are occupied. To do this, we need to gather occupancy info from all rooms, and when we reach a threshold, we signal the heating system to start. This is a simple, but representative example of how we can use Cloud Node-Red (FRED) to augment ubidots.
Since Ubidots doesn’t allow users to easily manage state and to aggregate data, it’s a great use of an external logic facility to handle that – that’s why FRED is so helpful here!
Steps in this demo
Create a UbiDots device by using the add device facility. Choose the Blank Device category and name it “particle”.
Then create five raw variables: PIR, PIR2, PIR3, PIR4, totalpir. These correspond to our four motion PIR sensors and a synthetic variable, totalpir, which is the count of how many active sensors are triggered, i.e how many rooms are occupied in our home.
You will need to note down the token generated by Ubidots – this is used throughout this example to link together the particle device, FRED and ubidots virtual devices. It is shown hidden in our screenshot below, so make it visible and copy for later use.

There are two main steps needed to setup your Particle device and publish data. In this example we are going to use the MQTT library for Ubidots which is provided by Ubidots.
A comprehensive tutorial on using Particle devices with Ubidots is available on the Ubidots website. If you need more information head over there and read through – it includes links to other tasks such as creating Ubidots devices and variables so is a great resource.
In the Particle’s Web IDE create a New App and set the name. For additional details to creating a New App, head over to this article and return once complete.
Then select the libraries tab in the Particle IDE and select the UBIDOTSMQTT library. Make sure to add the last version library.
Click on INCLUDE IN APP. And return to “MYAPP.ino”
This library creates by default a new Device. The name of this device will be “Particle” by default, and his label will be your Particle Core ID.
The default code that the Particle IDE generates, now needs to be adapted for our use case. You will need to:
client.add("PIR", pir); // Insert as first parameter your variable label
client.ubidotsPublish("particle"); // Insert your device label where the
                                   // values will be stored
Input this code into the Particle Cloud IDE, and then publish to your particle device from the IDE. The full code listing is reproduced below, you can copy this and replace it in your IDE.
Particle code:
// This #include statement was automatically added by the Particle IDE.
#include <UbidotsMQTT.h>
#ifndef TOKEN
#define TOKEN “BBFF-…” // Add here your Ubidots TOKEN
#endif
void callback(char* topic, byte* payload, unsigned int length) {}
UbidotsMQTT client(TOKEN, callback);
void setup() {
Serial.begin(115200);
client.ubidotsSetBroker(“industrial.api.ubidots.com“);
client.connect();
}
void loop() {
if(!client.isConnected()){
client.connect();
}
int pir = digitalRead(D0);
// Publish routine, if the device and variables are not created they will be created
Serial.println(“Sending value”);
client.add(“PIR”, pir); // Insert as first parameter your variable label
client.ubidotsPublish(“particle”); // Insert your device label where the values will be stored
// Client loop for publishing and to maintain the connection
client.loop();
delay(10000);
}
Now that we have the particle board sensing data and sending it to Ubidots (via the particle cloud) let’s build the Node-Red flow on FRED which we need to process the data.
If you don’t already have an account on FRED (Cloud Node-RED), set one up now. It’s free for a demo account, which can be used for these tutorials and any other experiments you may have with Node-RED. Register for a free account at http://fred.sensetecnic.com.
After registering, make sure to activate your account via your email. You will not be able to log in until you validate your account.
Our final flow will look like the one below.

To get started, head over to your FRED account, create a new flow canvas, and begin by creating a Ubidots in Node.
Once you have created the Ubidots in node, click on it and you will see the following configuration screen.
UbiDots node’s configuration:
Fill in the Token field using the authentication token shown when you first created the device in Ubidots (it is shown hidden in our screenshot back in step 1) and the names of the variables you created in Ubidots (pir, pir2 ……)
Once you have configured the node, drag a function node to the canvas, and wire the output of the Ubidots in node to this new function node. Then click on the function node, name it totalPir, and copy the following code into the function.

This code is fairly simple and pulls the PIR sensor values from the incoming message (line 3), then calculates the aggregate value for all sensors on line 9, which it places in the outgoing message.
Next wire the output of the function node to a ubidots out node – this will allow us to see the aggregate value (totalPir) in our ubidots dashboard. Then connect a switch node and a http request node.
Then find and drag a switch node onto the canvas, and connect it to the function node. Configure it for the threshold value you want to trigger the heating. For example, if you require 3 rooms to be occupied before you turn on the home heating then set its value to 3.

Lastly, create a http request node, and wire that to the switch node. We don’t show the details here because each home controller is different. We assume that your home heating control has a web interface that accepts http commands for control.
How you configure this node is dependent on your specific home controller, but for some examples of how the http request node is used, take a look at this tutorial.
Finally, to check that everything is working locally, drag a debug node to the canvas and wire it up to the function node so that you can see the output locally before it is sent to Ubidots.
Once the flow is set up, we can hit the deploy button in the top right of the screen in FRED so that it is running in the cloud and then take a look at the output. Firstly, if you look at the debug node you will see the following:

Once you are sure that is working OK, head over to Ubidots and take a look at the UbiDots totalPir variable. It should look something like the screenshot seen below:

As you can see, as the flow runs in FRED it keeps track of the total number of motion sensors that are active and shows that on Ubidots.
This is a simple example of how you can use the FRED service to combine cloud Node-RED with Ubidots. This allows you to keep all the ease of use and simplicity of Ubidots, but when you need it, to augment Ubidots with a full processing engine. Although the example we show here is quite simple, it should be clear that once you link ubidots to FRED, you have a full programming environment at your disposal. More complex examples of Node-RED flows could be used to:
In fact, since Node-RED is a full programming environment, there is no limit to what FRED allows you to develop. FRED plus Ubidots – power through simplicity.
A general introduction to Node-RED programming – free online course
A comprehensive set of Node-RED tutorials
Tutorials, guides and other info for Ubidots
We’ve seen a few folks playing around with FRED to access – and in some cases – trade on cryptocurrencies, which we thought was a fun use of Node-RED. Our very own crypto expert, Ted, here at STS decided to jump in and develop a new Node for accessing and using the Binance cryptocurrency platform. Continue reading “FRED (Cloud Node-RED) and cryptocurrencies”
In this tutorial we take our Pi-Zero security camera scenario one step further and add image recognition Continue reading “Add Image Recognition to your FRED (cloud Node-RED) Remote Security Camera Application”
OSIsoft PI System is an industrial data management system that is widely used to capture, process, analyze, and store any form of real-time data. With the flexibility and powerful features of FRED, users can add more values to their current OSIsoft PI System. Continue reading “Tutorial: Using the OSIsoft PI Web API node with FRED (Cloud Node-RED)”
LoRa wireless modulation is a very popular wireless communication technology for IoT development. Its long range and low power consumption features make it suitable for many IoT applications. After we tested out the LoRaWan network on a single channel gateway in our previous blog posts, Continue reading “Using FRED (Cloud Node-RED) with the MultiTech LoRaWAN gateway”
The new Pi Zero W is a great hardware platform for creating all kinds of interesting hardware gadgets. With built in bluetooth, wifi, and a camera connector, it seems like the ideal system for creating a security cam. Of course one of the best things about the Pi Zero is that it runs Node-RED! Continue reading “Monitor a Pi Zero-hosted security camera with Node-RED, FRED and STS-MQTT”
LoRa wireless modulation is growing in popularity for IoT development. Its long range and low power consumption make it suitable for many IoT applications. This blog post will discuss the experience setting up a LoRa P2P network using the Adafruit Feather M0 Lora module board and Dragino Lora/GPS HAT on a Raspberry Pi. Continue reading “Use FRED (Cloud Node-RED) with LoRa modulation (P2P connection)”
LoRa wireless modulation is a very popular wireless communication technology for IoT development. Its long range and low power consumption features make it suitable for many IoT applications. After we tested out the LoRa P2P network in our last blog post, this post will focus on setting up a network of LoRa devices following the LoRaWan protocol and sending data to the The Things Network. Continue reading “Use FRED (Cloud Node-RED) with LoRaWAN”
By hosting node-red in the cloud, FRED can act as an intermediary between devices and cloud services. To illustrate this, let’s create a system that send a notification when a user wearing a Fitbit Flex comes in range of a Bluetooth scanner. We’ll distribute the job of discovering and filtering bluetooth devices between a device and a FRED-hosted node-red instance. This will allow us to change how notifications are delivered, or make use of the scanner for other purposes without changing the device flow. Continue reading “Detect Presence using a FitBit, Node-RED and FRED”


