
MQTT is a popular protocol for data transmission for many developers, especially for Internet of Things applications. The new Sense Tecnic MQTT service (STS MQTT) provides FRED users an easy way to setup and to manage MQTT connections with devices and Node-RED on FRED. This blog post shows you how to use the public data feeds feature on our STS-MQTT platform for publishing and subscribing to public data streams.
About STS-MQTT
MQTT is a lightweight connection protocol based on a publish and subscribe (pub/sub) model that decouples senders or publishers of data from receivers, or subscribers. STS-MQTT is a cloud-hosted MQTT broker service that not only provides a reliable MQTT connection but also enhances the user experience with a simple, clean and efficient user interface for managing topics and connections.
Create a STS service Account
If you don’t already have an account on FRED, set one up now. You will need to be a paid user (FRED Tall or Grande plan) in order to create clients as it is required in this blog post. You can visit https://fred.sensetecnic.com or https://mqtt.sensetecnic.com to create your STS account and check out the subscription options.
After registering, make sure to activate your account by email. You will not be able to log in until you validate your account.
Getting Started
Login to STS-MQTT platform
To log in to STS-MQTT, make sure you have already registered your STS service account. Since the accounts are unified on STS service platform, you can use your existing FRED accounts to log in on the STS-MQTT platform if you have one. Go to https://mqtt.sensetecnic.com/, if you already have signed in before, you will be automatically logged in, otherwise, you will be prompted to log in.
If you don’t have a STS service account, will be redirected to the Sense Tecnic Account Registration page. Remember, you need a paid subscription (Tall or Grande) to use the STS MQTT service.
If you have a FRED account already, you can just click “Login here” at the landing page and enter your STS service user credentials https://mqtt.sensetecnic.com/
Once you have entered your credentials, you will be redirected to the dashboard of the STS-MQTT service. Click on the Topics Gallery tab, to see all of the public topic channels available on STS-MQTT platform shared by yourself and other users.
A Look at the Topics Gallery
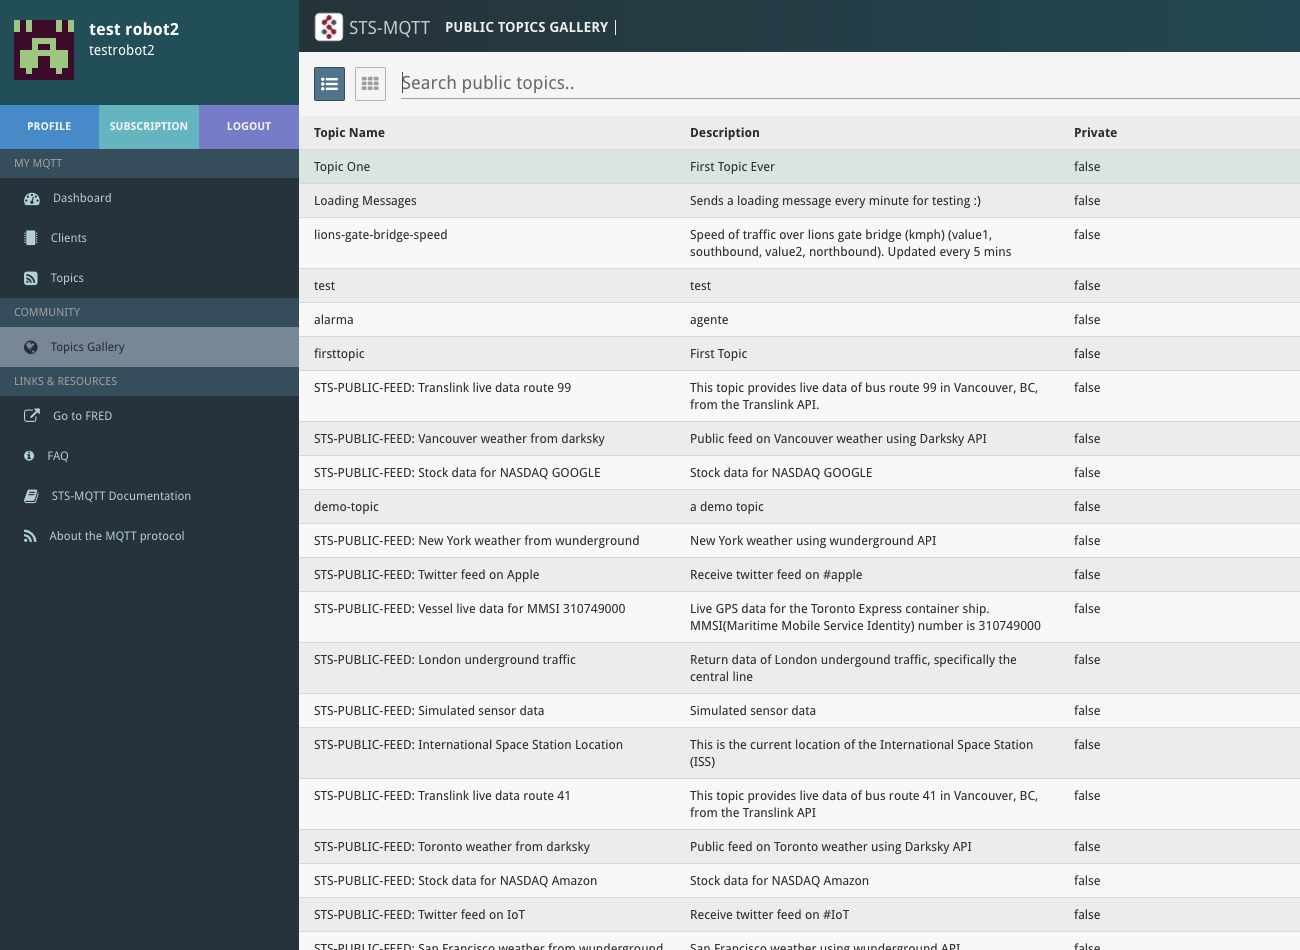
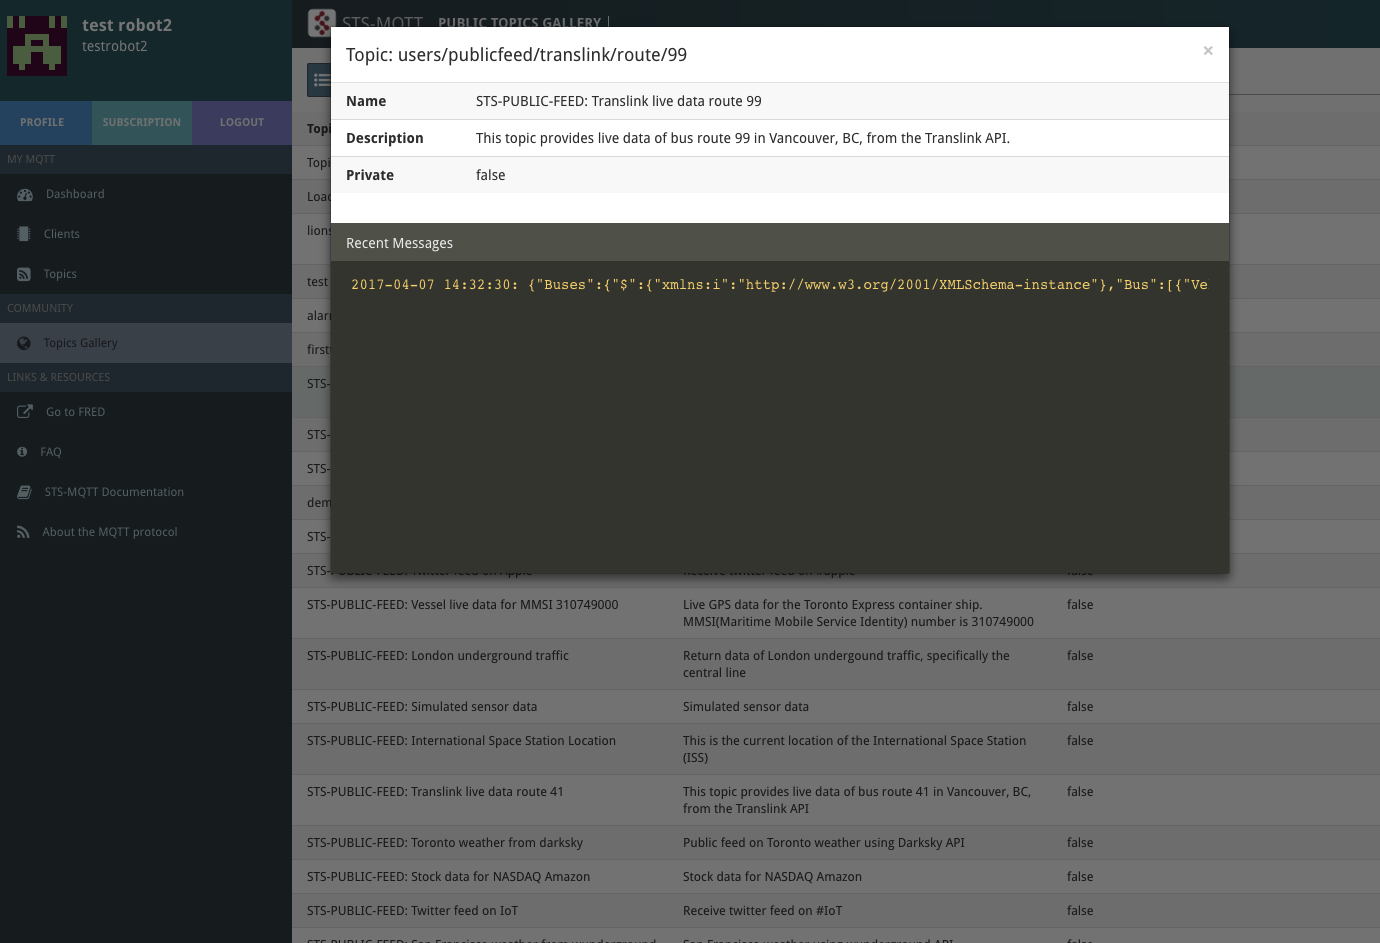
If you click on any of these public topics, you will be able to see the details of the topic and any incoming messages while the topic window is opened in your browser.
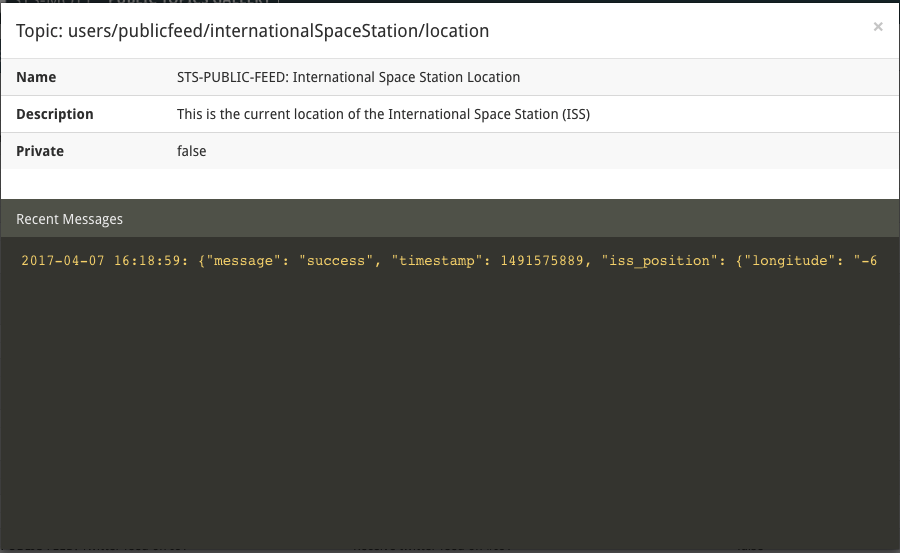
The STS Public Data Feeds
We have provided some public data feeds to view. Type in “STS-PUBLIC-FEED” in the search area, and you will see the list of STS public feeds:
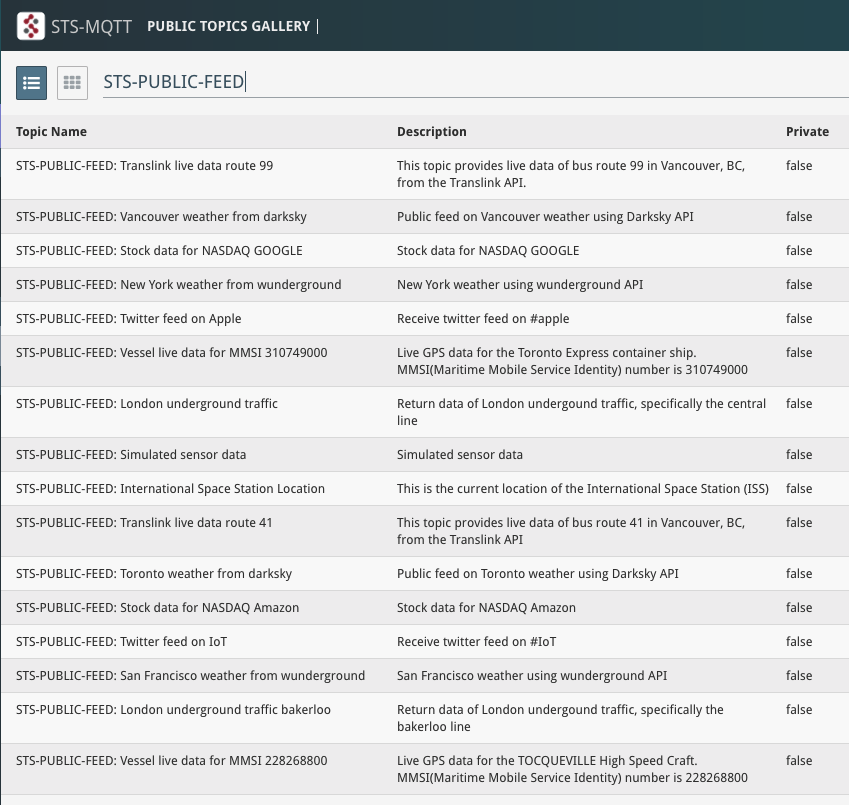
These topics contain various types of data including time series data, locations, sensor readings, and financial feeds with messages containing numerical and string values. The FRED service is used to obtain this data and forward it to STS-MQTT.
Next, let’s use these public feeds in a Node-RED flow hosted on FRED.
Subscribing to Public Feeds*
Let’s begin with creating a client. We will need to create a client for the connection on FRED.
We go to the Clients tab, and click ![]()
This will bring up a dialog for you to create your client as shown.
* Note that only paid subscribers can create new Clients.
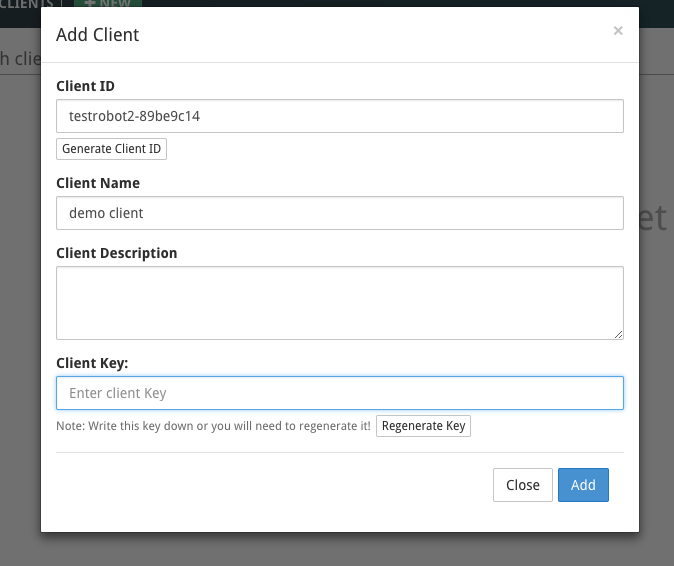
First, you need to enter a unique Client name for you to manage the clients on STS-MQTT platform. The Client ID and Client Key are auto-generated when the dialog shows up, but you can also overwrite with your own Client ID and Client Key. Once you are ready, you can click Add button to add the client.
Note: If you decide to edit the Client ID, remember that it must be unique across the entire service.
Note: You should copy the Client Key somewhere else as you will not be able to view the Client Key later on. If by any chance that you lost your client key, you will need to update the client with a re-generated client key.
Once you are done, you should see the new client show up in your Clients tab.
Note: You should have a unique client for each connection you are making to the STS-MQTT broker.
Connect to STS-MQTT from FRED
On FRED, we had developed a STS-MQTT node that helps your connect to the STS-MQTT platform easily.
You can install the node by looking up “sts–mqtt” in “Add or Remove Nodes”. If your instance is already running when you install the node, you will need to restart your instance in order to add the node in the node list.
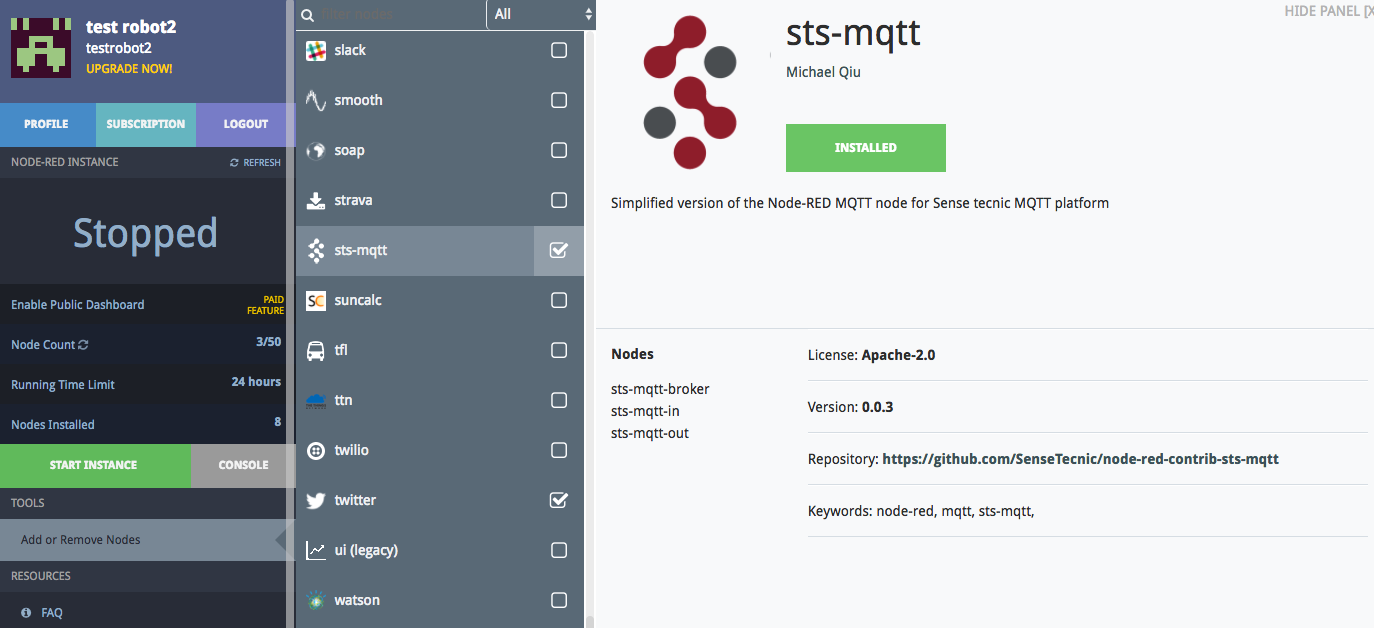
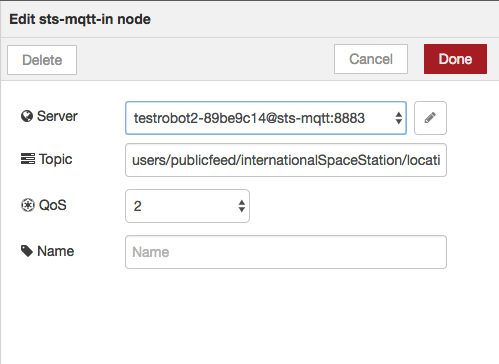
Once you have installed the node, simply drag the STS-MQTT in node onto the editor, and double click to config:
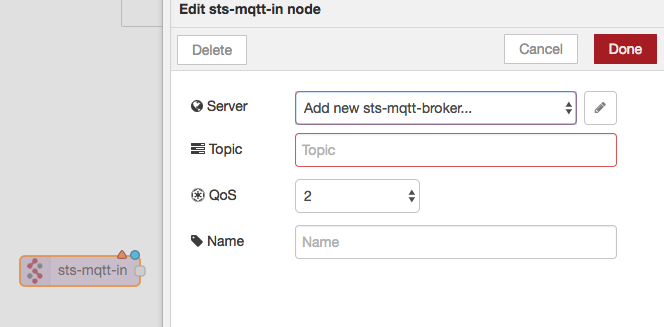
We can add a new sts-mqtt-broker:
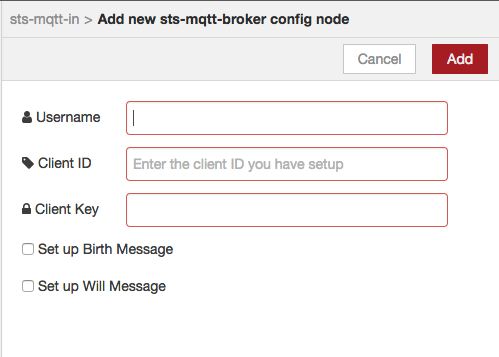
It is very simple to set up the broker, you just need to enter your FRED username, the client ID and client key that you obtained from the STS-MQTT platform when you created the client.
Once you fill in these fields and click the add button, the broker will be added. Now we will enter the topic in the sts-mqtt in config tab.
For example, we would like to keep track of the location of the international space station. We first find the topic in topics gallery.
So, in the topic field, you will enter
users/publicfeed/internationalSpaceStation/location
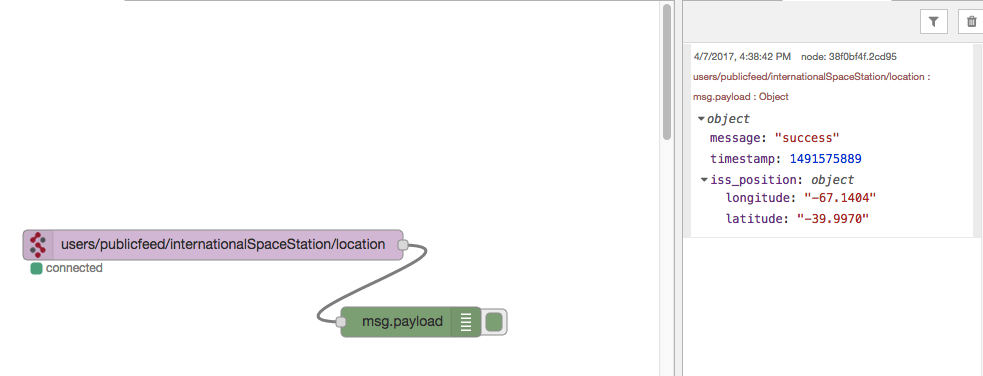
It should look like
You can also attach a debug node to monitor the data output. Once you deploy the flow, you should see data coming in.
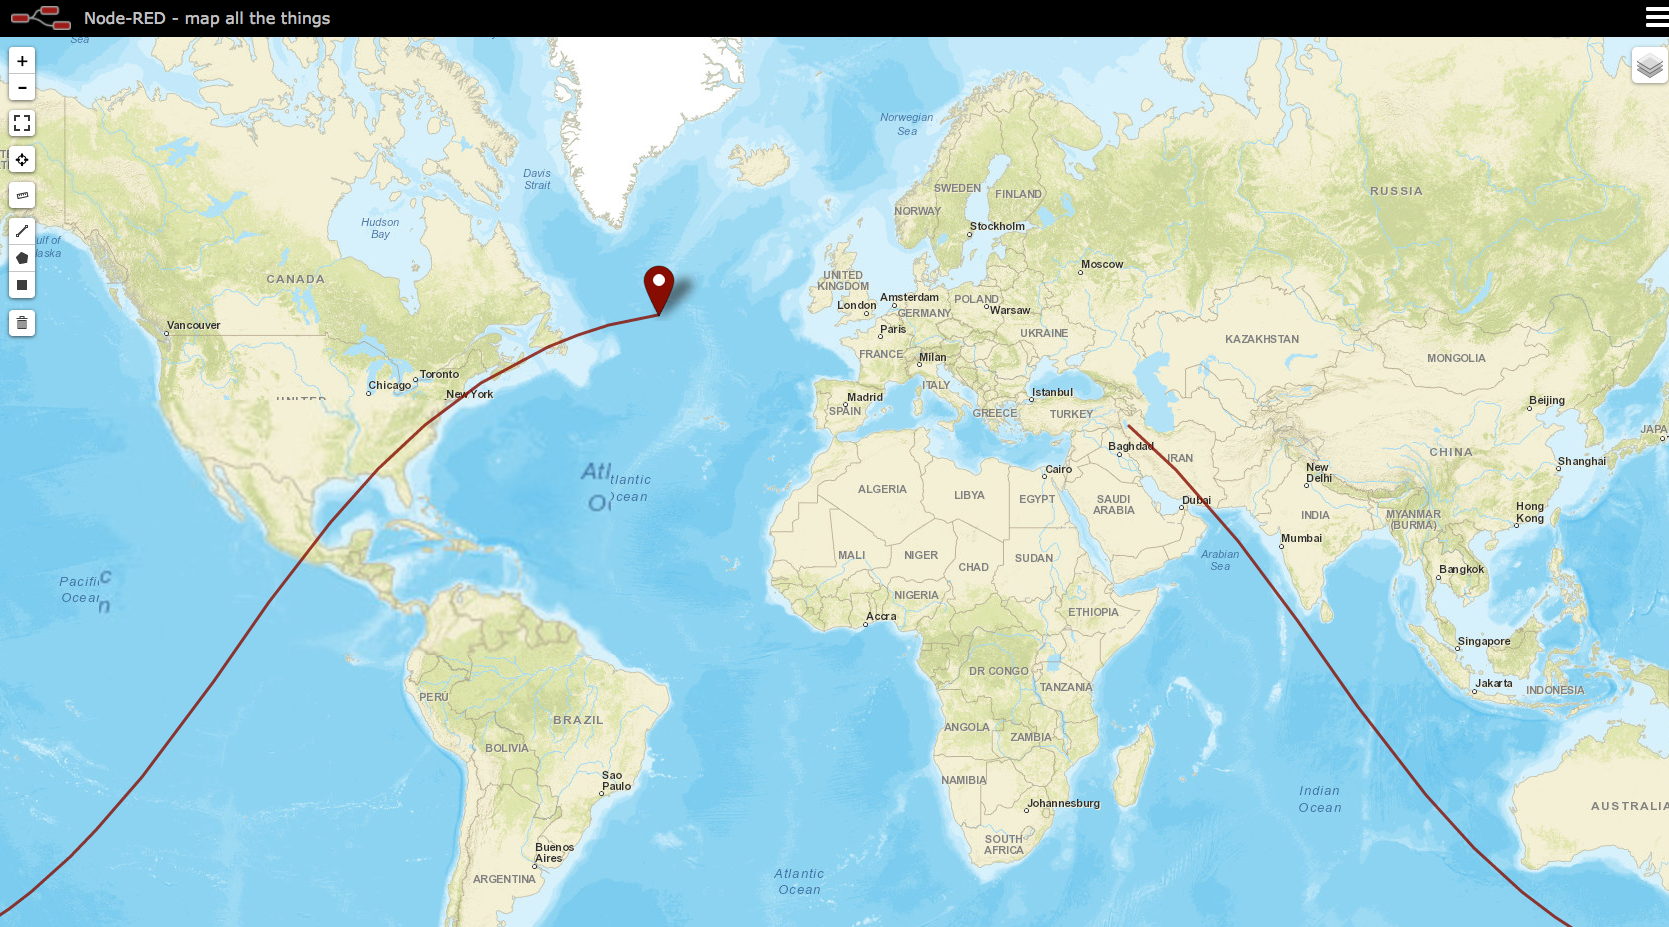
Now that you have data coming into FRED, let’s do something interesting with it, like display it on a map.
Visualizing Public Location Data using a Map
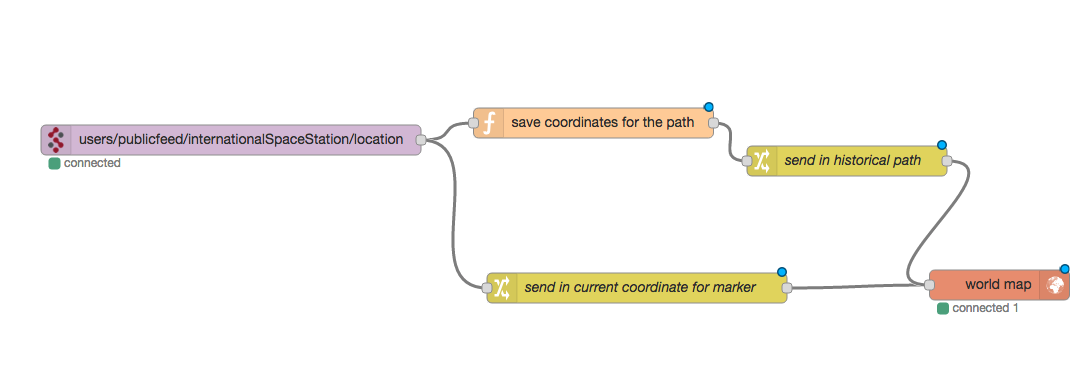
We can show the location of the International Space Station and its path in real time like this:
To do this, you will need the node-red-contrib-web-worldmap node. You can install this node in the “Add or Remove Nodes” list:
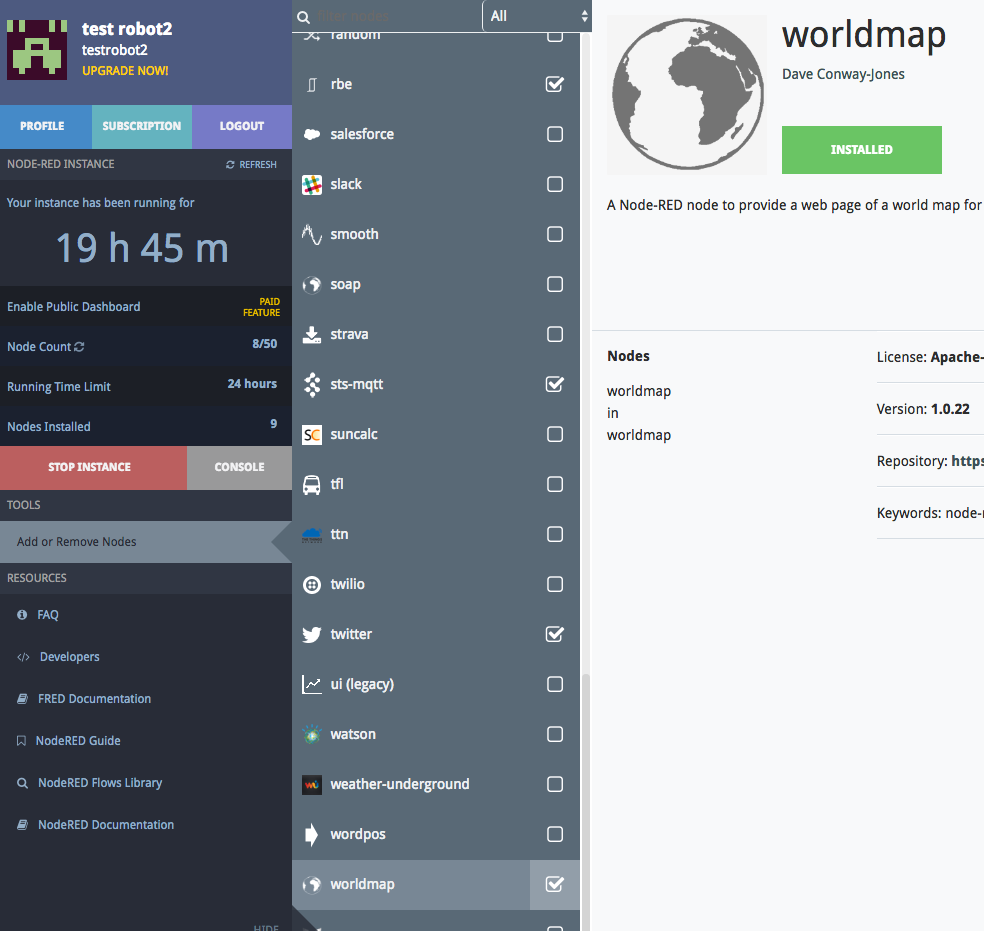
If your instance is already running when you install the node, you will need to restart your instance in order to reload your node list.
Drag the worldmap in node onto the editor, and we need to process the data going into this node. We need to send two messages, one is an array of the historical coordinate points so the map node can draw the path, the other message is the current coordinate for the marker to be shown on the map.
The flow will look like this
In the function node “save coordinates for the path”, we will save the historical data in context, and push the new data into a 2-dimensional array object. The code looks like this:
var coordinates = context.get("coords") || [];
var subCoord = [];
subCoord.push(msg.payload.iss_position.latitude*1); //make sure we send in number instead of string for this node
subCoord.push(msg.payload.iss_position.longitude*1); // make sure we send in number instead of string for this node
coordinates.push(subCoord);

context.set('coords', coordinates);
msg.payload.line = coordinates;

return msg;
Then, we will need a change node to clean up the message object, we have the change node named “send in historical path” like this
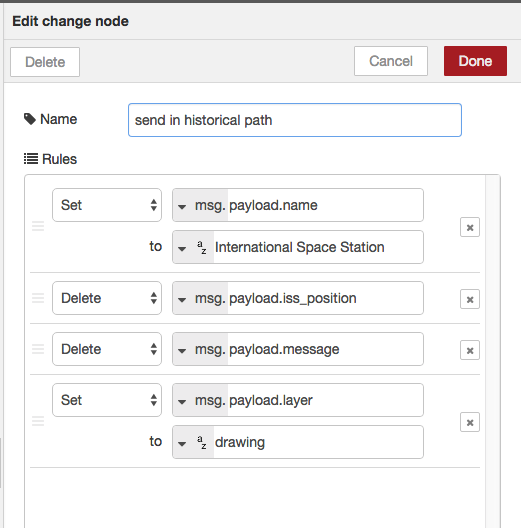
It’s important to specify the “name” of this message object, and which layer you want to draw the path.
For the other message where you send in the current coordinates, you will have a change node “send in current coordinate for marker”

This change node simply set the msg.payload.lon, msg.payload.lat and msg.payload.name properties. Again, these are required for showing the marker on the map.
Now you can access the worldmap page by entering
https://{Your username}.fred.sensetecnic.com/api/worldmap/
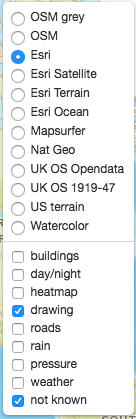
in your browser. You will also need to activate the “drawing” layer since we specified the path to be shown in this layer. Simply click the  button located at the top right corner of the worldmap page, and then check the drawing layer:
And you should see the map starting to draw the path and showing the location of the International Space Station!
Troubleshooting
- I cannot log into the STS-MQTT platform.
Your STS service accounts are unified which means that your account can be used on our FRED system and STS-MQTT.
If you have forgotten your password, simply reset your password at the login page.
If you have not yet activated your account via our confirmation email, you can request to resend the activation email at the login page.
- I cannot create new clients.
Only paid users are allowed to create clients. If you have reached the limit on your client list, try removing unused clients.
- Can I reuse client ID
The short answer is no. Each client ID is unique and only one connection is allowed with a client ID at any time.
- I forgot my client key
Client key is required when you connect to the STS-MQTT platform. The client key is only visible when the client was created. If you lost your client key, you will need to regenerate the client key or update with your own key.
To do so, simply go to the Clients tab, click the edit button of the client that you had forgotten the client key. In the pop-up dialog, enter your own client key or click regenerate client key. Ensure you copy the new client key and then click the Update button.
- What do I put in for the password field in the MQTT node on Node-RED/FRED?
You will enter your client key in the password field in the MQTT node.
- I cannot connect to STS-MQTT on my Raspberry Pi/FRED
Ensure you have entered the correct server address, server port, client-ID, user name and client key in your MQTT node. Also, check if you have successfully created the client on STS-MQTT.
You can also view the debug messages in the dashboard of STS-MQTT.
- My MQTT node keeps connecting and disconnecting alternatingly.
This could be due to a duplicate connection to a client ID. Check if there is only one connection to the client ID you are trying to reach.
- My MQTT node is connected, but I cannot send/receive messages.
You can monitor a topic in STS-MQTT to check if the message is reaching the STS-MQTT platform. You can do so by subscribing the topic in the dashboard or click on a specific topic in the topic field. You can double check if you publish/subscribe to the correct MQTT topic, and if you have the right to publish/subscribe to this MQTT topic.
- Will there be more data sources?
Yes we will add more data sources in the future.
If all else fails, contact us at support@sensetecnic.com and we’ll do our best to get you going.
Advanced ways of using STS-MQTT
For full details and more advanced information on using STS-MQTT, please refer to the documentation here.
About Sense Tecnic
Sense Tecnic Systems Inc have been building IoT applications and services since 2010. We provide FRED, cloud hosted Node-RED as a service to the community. We also offer a commercial version to our customers, as well as professional services. Learn more.