

In this guide you will learn how to use websockets in an HTML app. We will use FRED (cloud hosted Node-RED) to create a great chat application that uses websockets and does some simple message analysis.
The sample flow for this tutorial can be found in: https://github.com/SenseTecnic/tutorial-samples/tree/master/HTML-chat-app
If you are not sure how to import a sample flow, please refer to: http://developers.sensetecnic.com/article/how-to-import-a-node-red-flow/
What is Node RED?
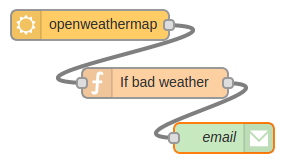
Node-RED is a visual tool for wiring the Internet of Things developed by IBM Emerging Technology and the open source community. Using Node-RED, developers wire up input, output and processing nodes to create flows to process data, control things, or send alerts. It works by allowing you to wire up web services or custom “nodes” to each other, or to things, to do things like:
- Send an email on a rainy weather forecast.
- Push sensor data to services like Twitter.
- Perform complex analysis on data with ease.
If you’re new to Node RED you might find our Introduction to Node RED tutorial very helpful.
About Sense Tecnic: Sense Tecnic Systems Inc have been building IoT applications and services since 2010. We provide FRED, cloud hosted Node-RED as a service to the community. We also offer a commercial version to our customers, as well as professional services. Learn more.
Creating a websocket server with Node RED
Let’s create a websockets service using Node RED. Connect a websocket node to a debug node like this:
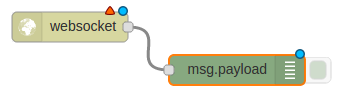
Now edit the websocket node and configure its type to be “Listen on”. Under Path add a new websocket-listener with the path “/public/messagereceive”. Click Add and then deploy the flow by clicking on the red “Deploy” button on the top of the page.

This flow will open a websockets service in the path:
[text]
https://{yourusername}.fred.sensetecnic.com/api/public/messagereceive
[/text]
We can now begin sending data to our service. We can use a websocket client, like wscat to test our service:

As you can see the debug node will print messages received to the debug panel on Node RED.
Creating an HTML chat app, with websockets
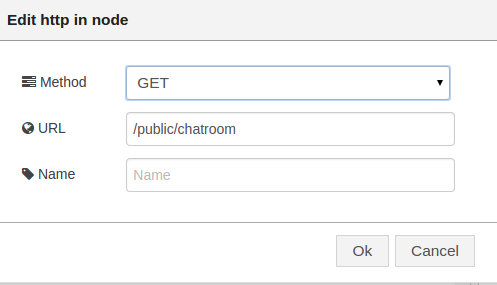
We are ready to create our HTML web application. Connect an HTTP input node, a Template node and an HTTP output node like this:

Let’s edit the HTTP input node to service “GET” request to the URL /public/chatroom. As you would probably have already guessed. This will be accessible to you at:
[text]
https://{yourusername}.fred.sensetecnic.com/api/public/chatroom
[/text]
Now, edit the Template node and configure it to be of type “none”. Now paste the following code:
<html lang="en">
<head>
 <meta charset="utf-8">
 <title>FRED-powered chat app</title>
 <script src="http://code.jquery.com/jquery-1.11.3.min.js"></script>
 <script src="http:///code.jquery.com/jquery-migrate-1.2.1.min.js"></script>
</head>
<body>
 <div id="messages"></div>
 <!-- Important to configure onsubmit to false to prevent page refresh when pressing the return key -->
 <form id="form" onsubmit="return false;">
 <input id="text" type="text" onkeypress="return sendText(event)" />
 </form>
 <script type="text/javascript">

 // Open a websocket using FRED.
 var publishSocket = new WebSocket("wss://{yourusername}.fred.sensetecnic.com/api/public/messagereceive"); //server receives
 var listenSocket = new WebSocket("wss://{yourusername}.fred.sensetecnic.com/api/public/messagepublish"); //server publishes

 listenSocket.onmessage = function (event) {
 // When receiving a message append a div child to #messages
 data = JSON.parse(event.data);
 $("#messages").append("<div class='msg sentiment"+data.sentiment+"' >"+data.timestamp+" - "+data.msg+"</div>")
 if ($("#messages").children().length > 10 ) { $("#messages :first-child").remove();}
 }

 function sendText(event) {
 if (event.keyCode == 13) { // Only if return key pressed
 // Construct object containing the data the server needs.
 d = new Date();
 var data = {
 msg: $("#text").val(),
 timestamp: d.getHours() +":"+ d.getMinutes() + ":" + d.getSeconds()
 };
 publishSocket.send(JSON.stringify(data)); // Send the msg object as a JSON-formatted string.
 $("#text").val(""); // Blank the text input element
 }
 }
 </script>
</body>
</html>
The code is quite simple. On the head we import JQuery. On the body we declare a div and a form (notice the use of onsubmit=”return false;”, which disables the browser refreshing the page when pressing the return key). We will then use Javascript to do the magic.
From the javascript code, the following lines:
[javascript]
var publishSocket = new WebSocket(“wss://…”);
var listenSocket = new WebSocket(“wss://…”);
[/javascript]
will create two new WebSocket objects pointing to (remember to change yourusername to your own username):
[text]
wss://{yourusername}.fred.sensetecnic.com/api/public/messagereceive
[/text]
and:
[text]
wss://{yourusername}.fred.sensetecnic.com/api/public/messagepublish
[/text]
Notice how these URLs are prefixed with “wss” instead of “https”, while other tools, like wscat allow you to use https in the url the standard and proper way is to use ws://url.
Next, the function
[javascript]
listenSocket.onmessage = function (event) {
…
}
[/javascript]
will be called when the listenSocket receives a message, that is, when the server publishes a message on the service ‘/public/messagepublish‘. When new messages are published to that service our client will be notified and the code here will be run. In our example the code simply appends each message as a child to the messages div and does some cleaning of old messages so that our list doesn’t grow indefinitely.
Finally, the function:
[javascript]
function sendText(event) {
if (event.keyCode == 13) { // Only if return key pressed
// Construct object containing the data the server needs.
d = new Date();
var data = {
msg: $(“#text”).val(),
timestamp: d.getHours() +”:”+ d.getMinutes() + “:” + d.getSeconds()
};
// Send the msg object as a JSON-formatted string.
publishSocket.send(JSON.stringify(data));
// Blank the text input element
$(“#text”).val(“”);
}
}
[/javascript]
is called every time a key is pressed while the user types on the text input of the form we created earlier. The function will check that the character pressed is the return key (keyCode 13) and if so it will create an object containing our own format of timestamp and a message (msg). We will encode this object as a JSON string and send it to the client publish websocket service. Finally we will clear the text input.
Let’s try our app. Visit
https://{yourusername}.fred.sensetecnic.com/api/public/chatroom
and type some text on the text box.

You can see how the debug panel will print the message sent by the client. But there’s something missing… Our HTML client is not receiving messages back. This is because we haven’t published any messages on the /public/messagepublish websockets service, so the function bound to listenSocket.onmessage is not being called.
Let’s fix that.
Connect a function and websocket output node. Edit the websocket output node and add a new websocket-listener with the path /public/messagepublish
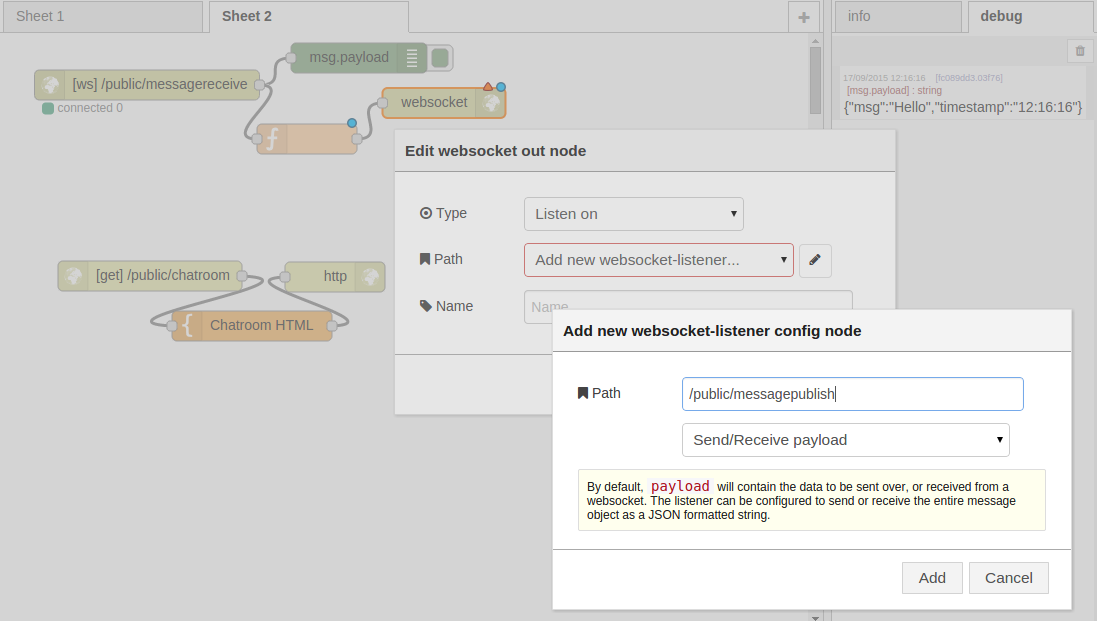
Now, edit the function node in between and add the following code:
[javascript]
return {payload: JSON.parse(msg.payload)};
[/javascript]
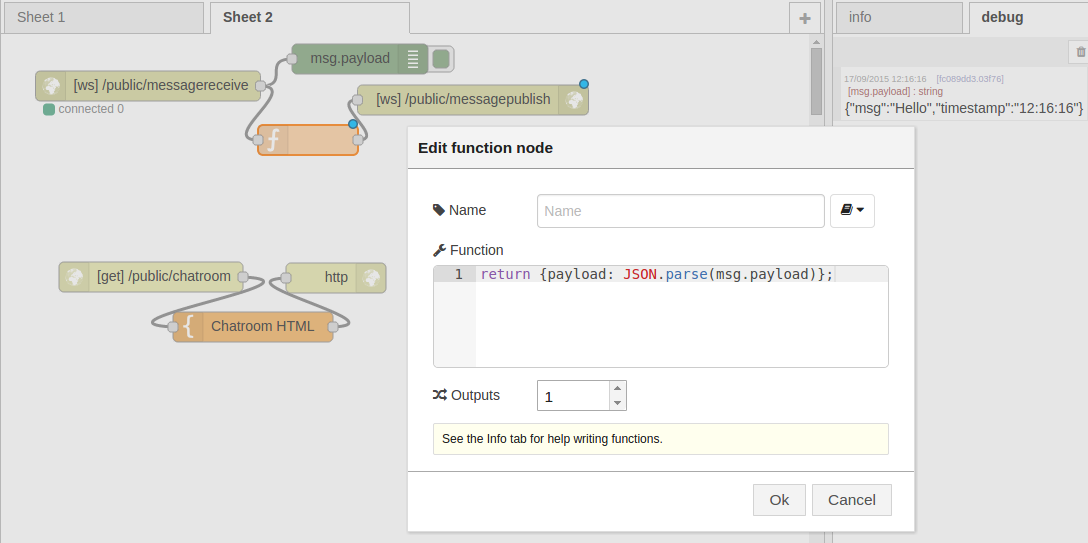
This code is very simple, it will parse the message received by the /public/messagereceive websocket service and add it as payload to be sent to the /public/messagepublish service.
Let’s try sending a message with our HTML client again:
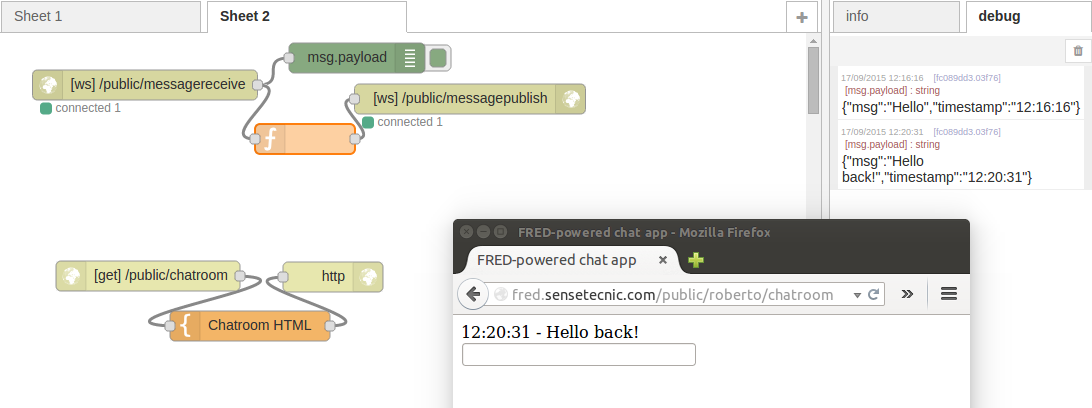
Success!! This time the message is being received by Node RED and returned to our client. Our client can then show the message. You will probably notice that the websocket nodes will inform you how many clients are connected to each one.
Creating a better HTML chat app, with websockets
So far our application is quite plain. We want to make it more visually appealing and it would be great to be able to tell our users if they are connected to the server before they begin typing messages on the text input.
Let’s modify our HTML template by double clicking on it and replacing the previous HTML code with the following code:
<!doctype html>
<html lang="en">
<head>
 <meta charset="utf-8">
 <title>FRED-powered chat app</title>
 <script src="https://code.jquery.com/jquery-1.11.3.min.js"></script>
 <script src="https:///code.jquery.com/jquery-migrate-1.2.1.min.js"></script>
 <style>
 #messages {border-color:#999; border-style:solid; width:250px; min-height:200px; margin:5px;}
 .msg {color:#FFF; background-color:#2980B9; padding:2px; margin:2px;}
 .server {color:#999; background-color:white; font-size:small;}
 #form {margin:5px;}
 #form input {width:250px;}
 </style>
</head>
<body>
 <div id="messages"></div>
 <form id="form" onsubmit="return false;">
 <input id="text" type="text" onkeypress="return sendText(event)" />
 </form>

 <script type="text/javascript">

 // Open a websocket using FRED.
 var publishSocket = new WebSocket("wss://{yourusername}.fred.sensetecnic.com/api/public/messagereceive");
 var listenSocket = new WebSocket("wss://{yourusername}.fred.sensetecnic.com/api/public/messagepublish");

 listenSocket.onmessage = function (event) {
 // When receiving a message append a div child to #messages
 data = JSON.parse(event.data);
 $("#messages").append("<div class='msg' >"+data.timestamp+" - "+data.msg+"</div>")
 if ($("#messages").children().length > 10 ) { $("#messages :first-child").remove()}
 }

 listenSocket.onclose = function(event){
 $("#messages").append("<div class='msg server'>Disconnected from server.</div>");
 }

 listenSocket.onopen = function(event){
 $("#messages").append("<div class='msg server'>Connected to server.</div>")
 }

 function sendText(event) {
 // Only if return key pressed
 if (event.keyCode == 13) {
 // Construct object containing the data the server needs.
 d = new Date();
 var data = {
 msg: $("#text").val(),
 timestamp: d.getHours() +":"+ d.getMinutes() + ":" + d.getSeconds()
 };
 // Send the msg object as a JSON-formatted string.
 publishSocket.send(JSON.stringify(data));
 // Blank the text input element
 $("#text").val("");
 }
 }
 </script>

</body>
</html>
In this HTML code we have added some styling on the header that will make our chat client a bit more visually interesting, including formatting for user messages (.msg) and connection status (.server). We have also added two functions to our javascript code:
[javascript]
listenSocket.onclose = function(event){
…
}
listenSocket.onopen = function(event){
…
}
[/javascript]
When our listenSocket object opens a connection we will call a function that will append “Connected to server”. When our listenSocket object closes a connection we will call a function that will append “Disconnected from Server”.
Let’s try our client again:
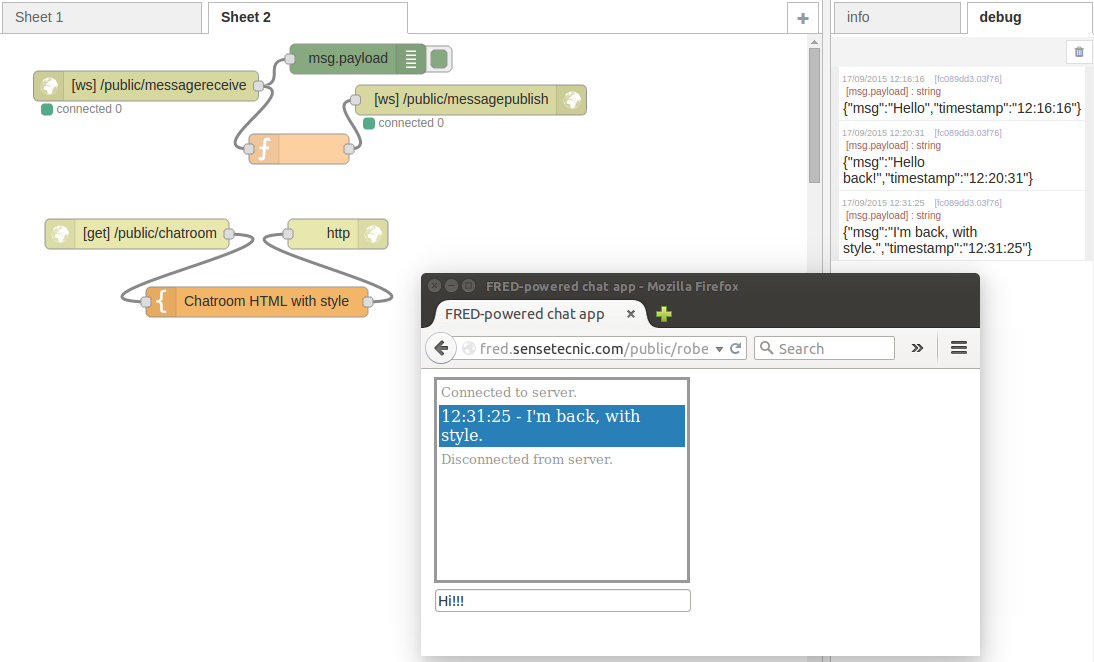
Our client is starting to look quite good! But we can do much better. We want to make a great chat app.
Creating a great HTML chat app, with websockets
One of the great advantages of using Node RED, and FRED in particular, is the wide selection of nodes we can use to store, analyse, and massage data.
Let’s harvest that power and build a chat room that does sentiment analysis of messages and renders positive or negative messages differently. Let’s begin by adding three nodes to our flow: a json node, a change node and a sentiment node just before our function node, like so:
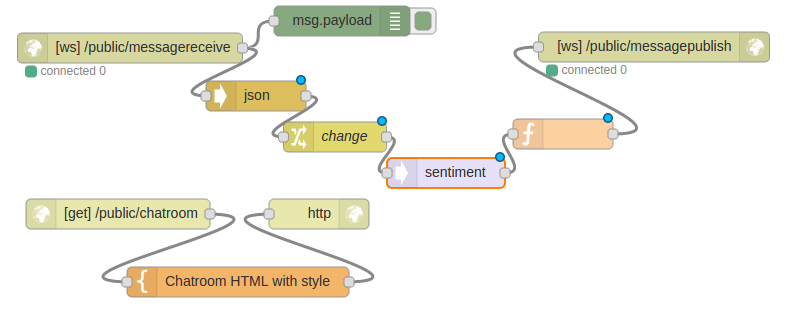
The json node is another way to parse the message sent by our client (remember our client sends the message as a JSON encoded string) so that we can use it in our Node RED flow.
If you click on the sentiment node and read the info panel you will notice that the node will analyze the text found in the payload of the message received by the node msg.payload.

We will have to use a change node to move data around so that the sentiment node can have access only to the text sent by our client, without the timestamp parameter. Double click the change node and add the following two rules:
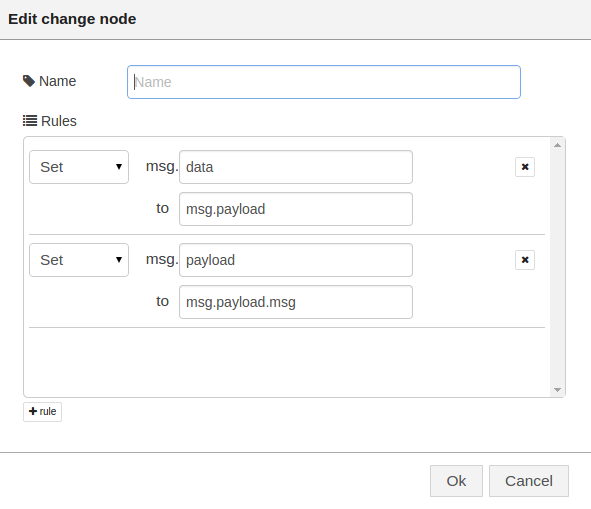
The first rule will copy msg.payload (the entire message sent by our client) into msg.data so that we can re-use it later if needed. The second rule will copy the content of msg.payload.msg (the text typed by our user) into msg.payload so that our sentiment node can analyse it. These two rules ensure that we keep the whole object sent by our HTML client for future use, while only passing the text typed by the user to the sentiment node. Now, let’s change our function node and paste the following code:
[javascript]
return {
payload: {
msg:msg.data.msg,
timestamp:msg.data.timestamp,
sentiment:msg.sentiment.score
}
};
[/javascript]
like so:
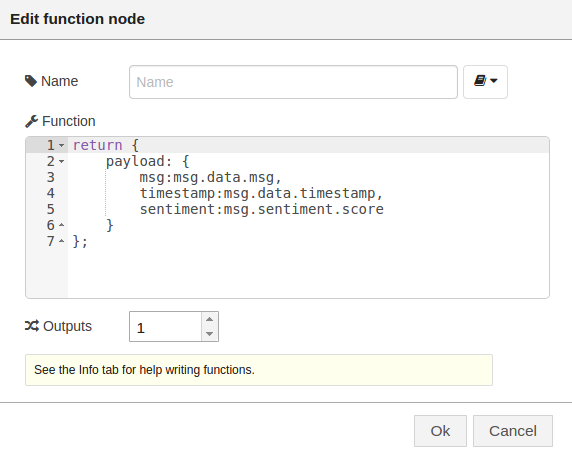
This is assembling an object with a payload containing the client message (stored in msg.data) and adding the resulting score from the sentiment analysis node.
We have one more thing to do. Change our HTML template node a bit to render each message according to the sentiment analysis value. We know from reading the sentiment analysis info panel that the score will vary from -5 to 5, -5 being negative sentiment, 5 being positive sentiment. We will modify our javascript code to add a class to each message in the form “sentiment-3” or “sentiment3” (let’s focus on only -3 and 3 for now). And we will add styling for them. Replace the HTML template code with the following:
<!doctype html>
<html lang="en">
<head>
 <meta charset="utf-8">
 <title>FRED-powered chat app</title>
 <script src="http://code.jquery.com/jquery-1.11.3.min.js"></script>
 <script src="http:///code.jquery.com/jquery-migrate-1.2.1.min.js"></script>
 <style>
 #messages {border-color:#999; border-style:solid; width:250px; min-height:200px; margin:5px;}
 .msg {color:#FFF; background-color:#2980B9; padding:2px; margin:2px;}
 .server {color:#999; background-color:white; font-size:small;}
 .sentiment-3 {background-color:#992222;}
 .sentiment0 {background-color:#2980B9;}
 .sentiment3 {background-color:#229922;}
 #form {margin:5px;}
 #form input {width:250px;}
 </style>
</head>
<body>
 <div id="messages"></div>
 <form id="form" onsubmit="return false;">
 <input id="text" type="text" onkeypress="return sendText(event)" />
 </form>

 <script type="text/javascript">

 // Open a websocket using FRED.
 var publishSocket = new WebSocket("ws://fred.sensetecnic.com/public/{yourusername}/messagereceive");
 var listenSocket = new WebSocket("ws://fred.sensetecnic.com/public/{yourusername}/messagepublish");

 listenSocket.onmessage = function (event) {
 // When receiving a message append a div child to #messages
 data = JSON.parse(event.data);
 $("#messages").append("<div class='msg sentiment"+data.sentiment+"' >"+data.timestamp+" - "+data.msg+"</div>")
 if ($("#messages").children().length > 10 ) { $("#messages :first-child").remove()}
 }

 listenSocket.onclose = function(event){
 $("#messages").append("<div class='msg server'>Disconnected from server.</div>");
 }

 listenSocket.onopen = function(event){
 $("#messages").append("<div class='msg server'>Connected to server.</div>")
 }

 function sendText(event) {
 // Only if return key pressed
 if (event.keyCode == 13) {
 // Construct object containing the data the server needs.
 d = new Date();
 var data = {
 msg: $("#text").val(),
 timestamp: d.getHours() +":"+ d.getMinutes() + ":" + d.getSeconds()
 };
 // Send the msg object as a JSON-formatted string.
 publishSocket.send(JSON.stringify(data));
 // Blank the text input element
 $("#text").val("");
 }
 }
 </script>

</body>
</html>
Now, let’s revisit our client application and try it out:
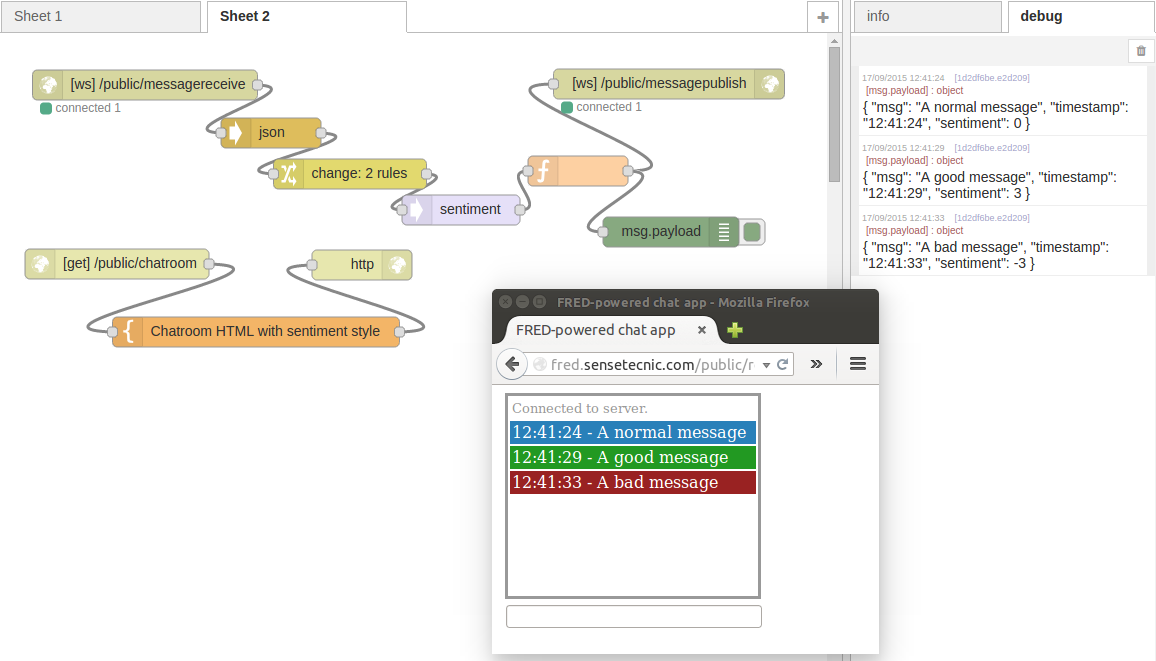
As you can see “A normal message” will print out as before, “A good message” with sentiment 3 will print in green, while “A bad message” with negative sentiment -3 will print in red.
Now we have a great chat app using websockets and the power of Node RED!
For your convenience we have published the flow on GitHub
About Sense Tecnic: Sense Tecnic Systems Inc have been building IoT applications and services since 2010. We provide these tutorials, and FRED, cloud hosted Node-RED as a service to the community. We also offer a commercial version to our customers, as well as professional services. Learn more.